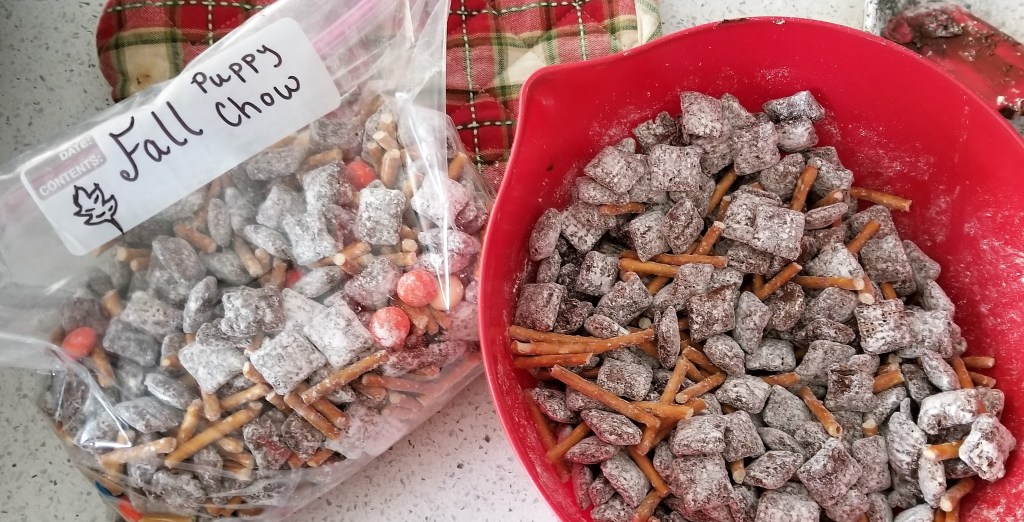
Not only was this my first time making puppy chow (which I have always referred to as Reindeer Poop), this was my first time trying it as well. Seeing as it was known as Poop in my head, I was not especially attracted to this version of Chex-Mix – until now.
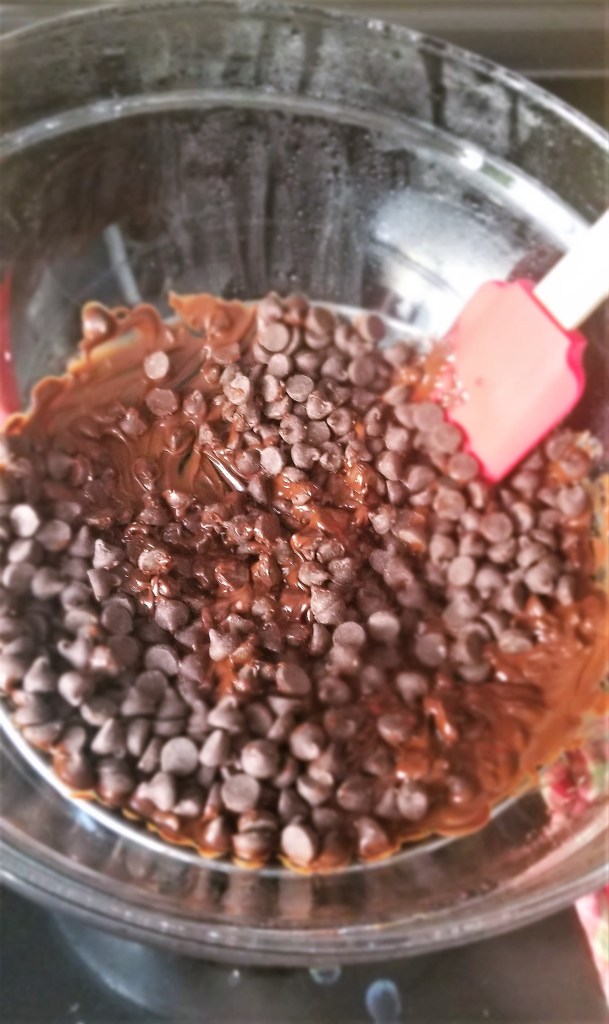
Make the ganache.
This recipe is inspired by my friend, colleague, and gym-partner who requested it as part of her birthday month. We discussed the potential in making it a fall food verses the traditional Christmas time (hello, reindeer) snack. There are many options to intensify the fall-ness of puppy chow as it is versatile and easy to improve. Add cinnamon, nutmeg, or allspice to the chocolate to spice things up. If you are serving this immediately, rather than storing it for a week’s snack, you could add bites of apple.
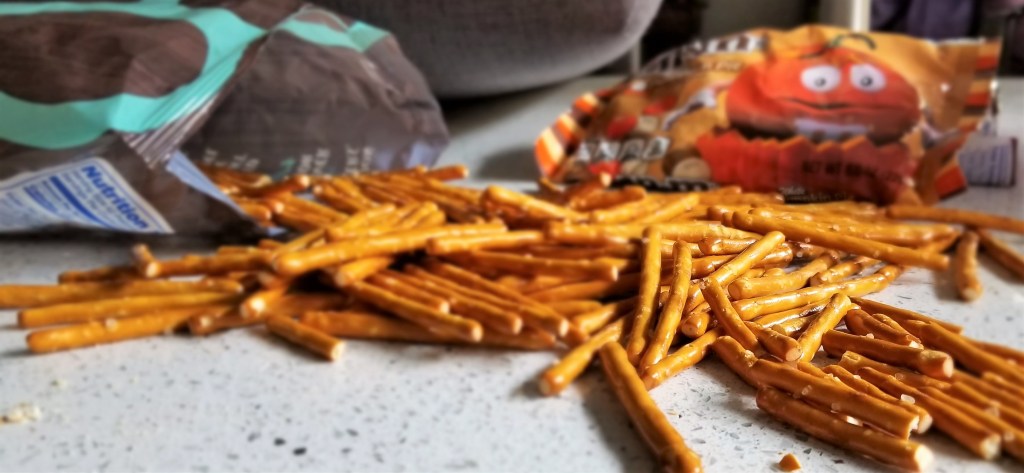
Breaking up the pretzels – free therapy.
Get creative and make it your own.
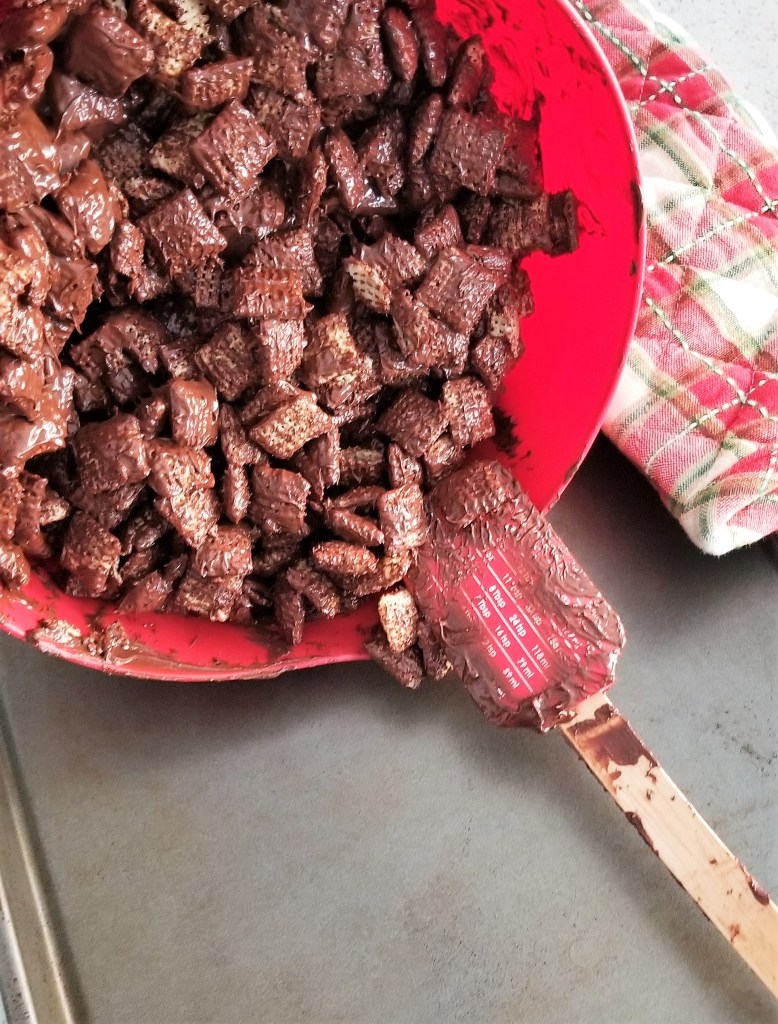
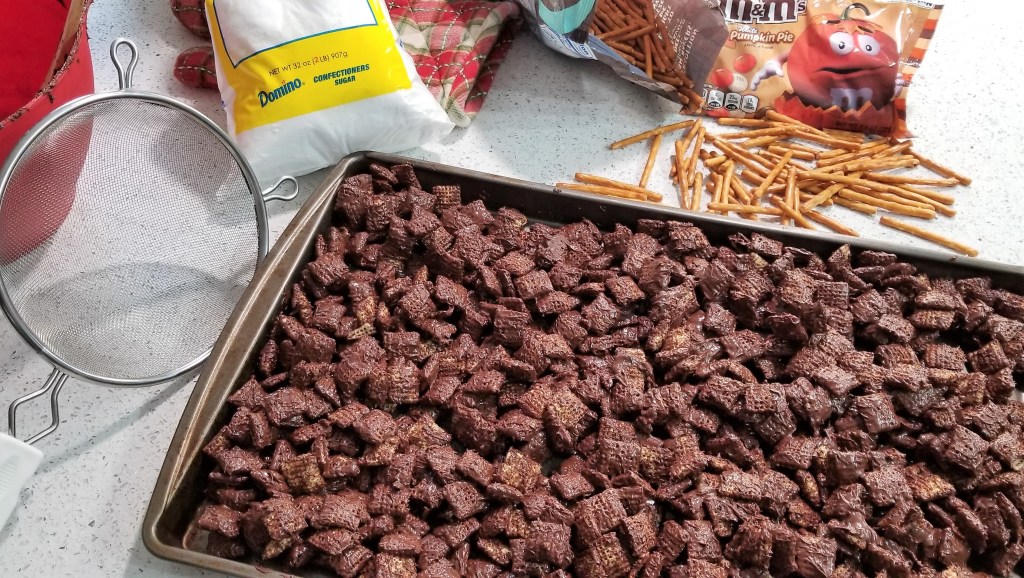
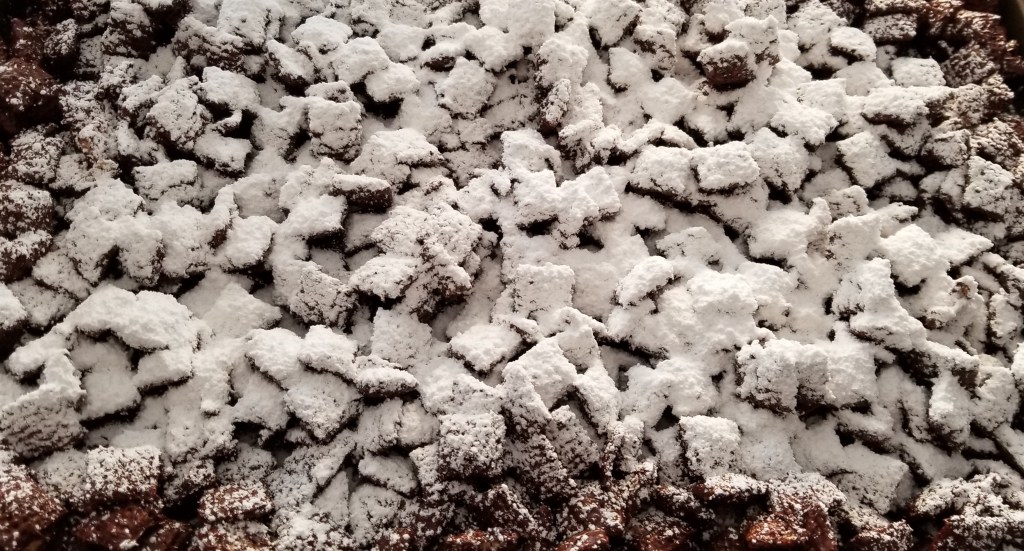
Take-Home Tips: The butter in the chocolate may be optional. I am not convinced it is necessary. Fold the chocolate into the Chex like you would a meringue; being gentle but getting the chocolate to the bottom of the Chex too. The Chex is sturdy but be gentle to avoid too much breakage. If you want your mix to still be a chocolate color, use 1 or 1.5 cups of powdered sugar rather than the whole 2 cups. For easy clean up, line your baking sheet with wax paper before pouring out the Chex into as even a layer as possible. When combining the remaining ingredients with the powdered Chex, it helps to sift some powdered sugar off before mixing together. If you can find small (1 inch) pretzel rods, use those, or the square pretzels. I couldn’t find one that small so I got pretzel sticks and broke them up.
No such thing as too much powdered sugar.
Scoring: 9 of 10. Everyone raved about how perfect this chow tastes. A good balance between sweet and salty, however it could be a little saltier considering the amount of powdered sugar. My friend does not recommend nuts, but I thought some cashews would be good. There are other savory options like sesame sticks and Gold Fish. If you cannot find the pumpkin pie M&Ms, there are candy corns (some love, some hate), other flavors of M&Ms (hazelnut, original, peanut butter, white chocolate), Reese’s mini peanut butter cups, or dried fruits (raisins or cranberries).
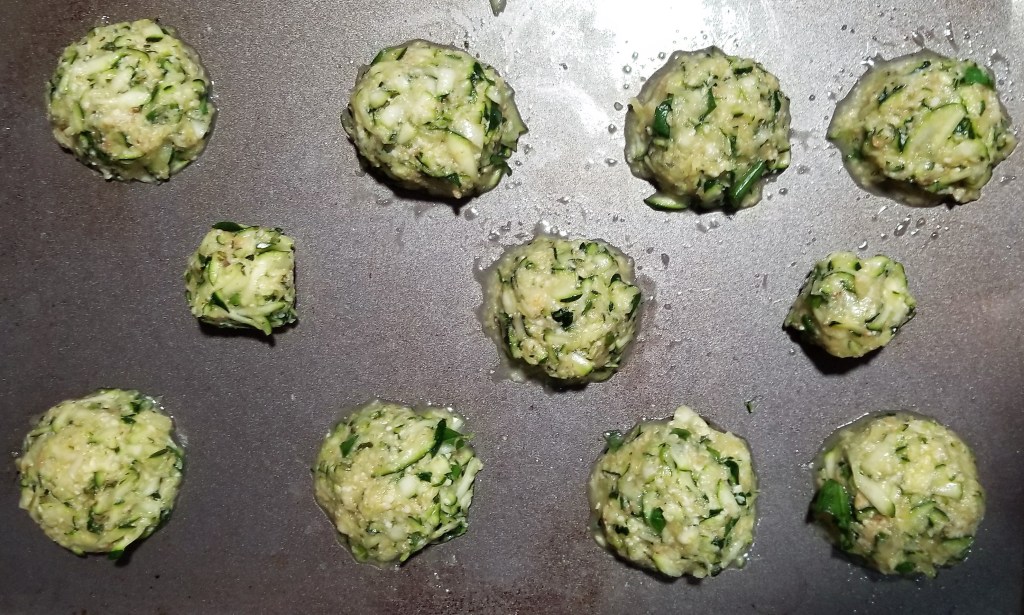
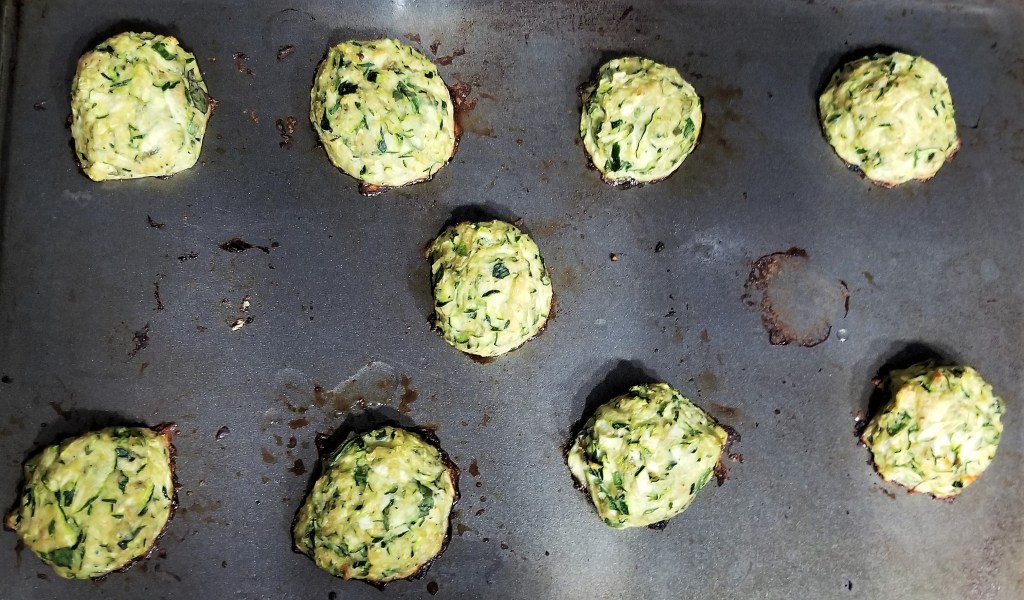
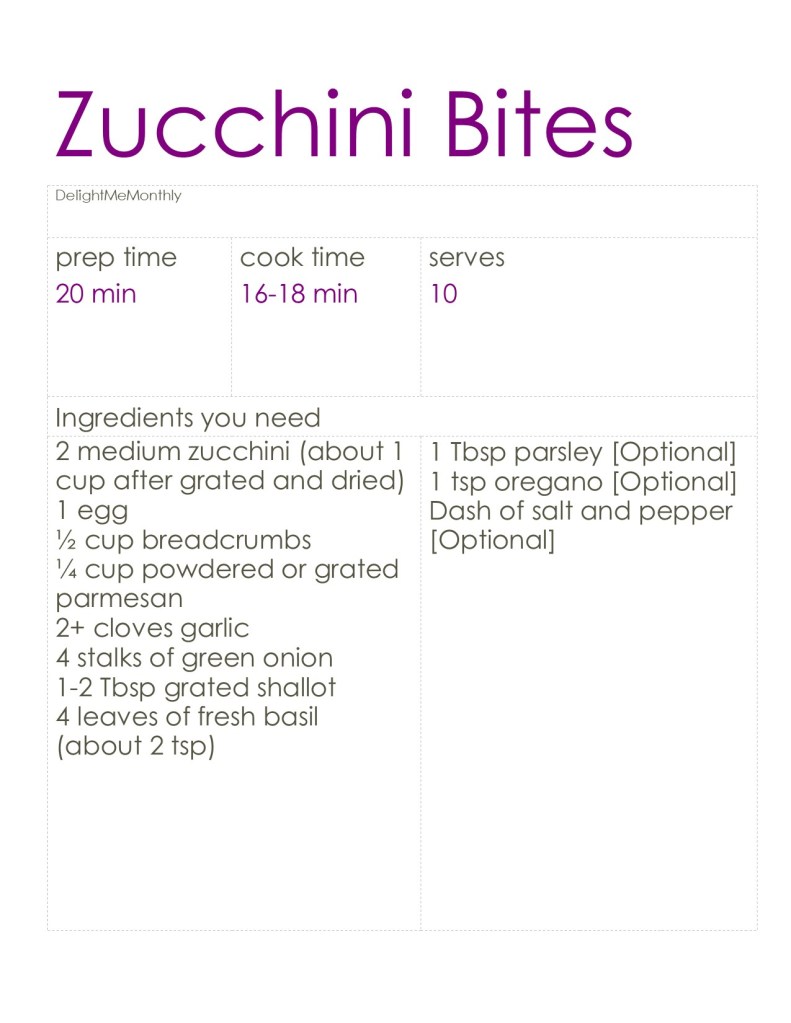
Zucchini (courgette in French) and similar summer squashes, make great additions to the fall dinner table. Sliced, steamed, spiraled, or even shredded, these fruits can be manipulated to suit your tastes. If you are someone who tries to hide your fruits and veggies in your other foods, zucchini bites or pancakes will be just right for you.
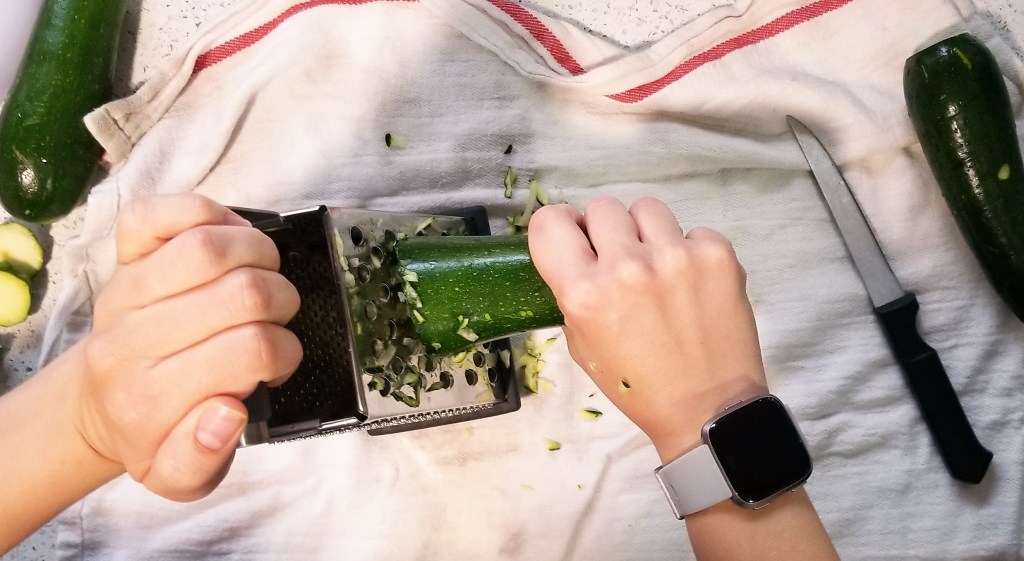
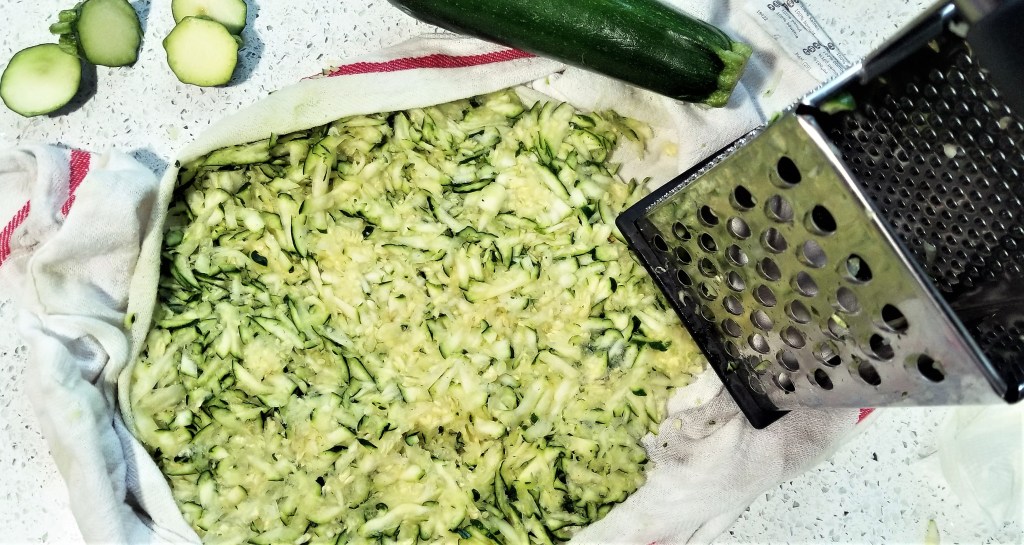
Shredding the zucchini on a cheesecloth
My husband tried these first and said they take like meatloaf. My initial reaction was disgust. I did not want my squash bites to taste like meatloaf. However, when I tasted them, I knew what he meant. When it hit the back of my throat it did remind me of meatloaf in a good way. I was not hungry by the time these were ready, having already snacked on some spaghetti squash. Regardless, I ate 6 of them, switching between ketchup and marinara. I could not decide which I liked better. The ketchup did assist the meatloaf experience, while the marinara was a more mellow supporter.
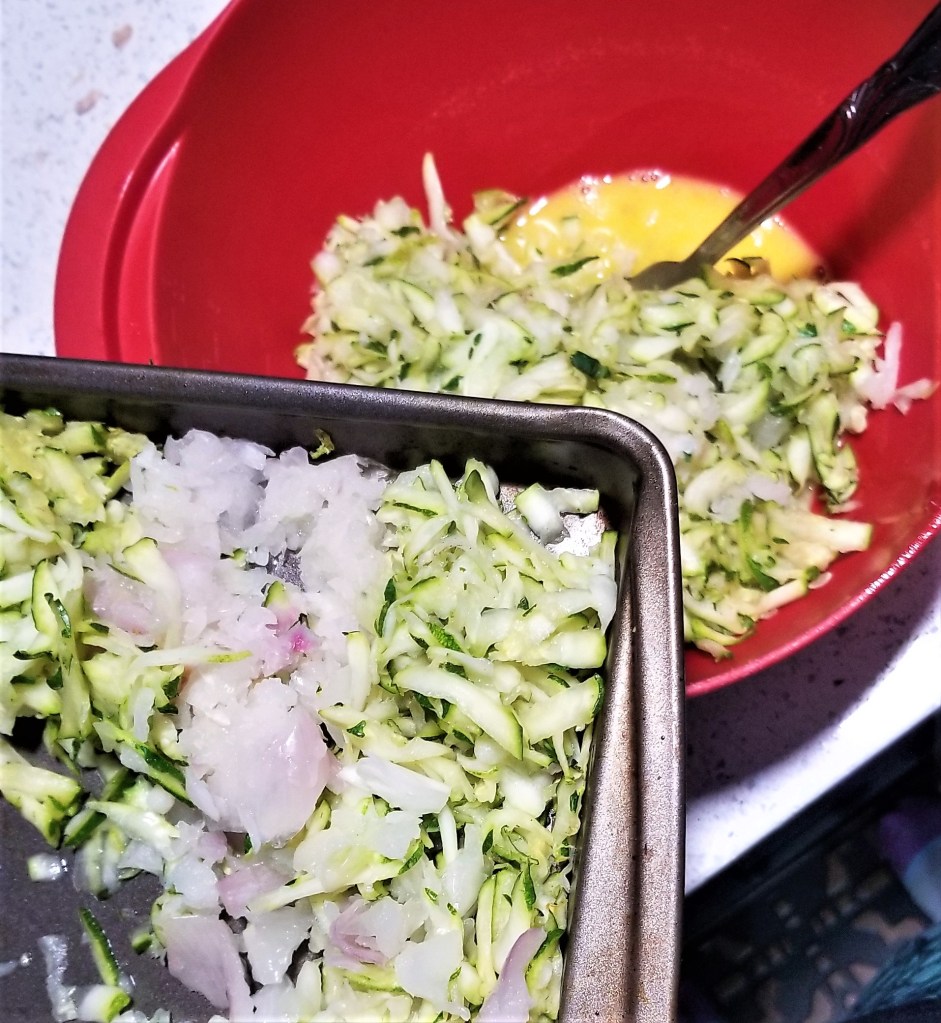
Baked to dry, then in the bowl.
Shredding the shallot and onion is tricky because it will burn more quickly than cutting them. Try refrigerating them first (over night or as long as possible) to reduce the burn. My old roommate swears by goggles or safety glasses. Whatever works for you, just be careful not to cut yourself on the grater. Better to dice the ends by hand than slice your fingers. Safety first.
Immediately after sampling these bite sized, savory treats, I knew they were worth the dishes, time, and effort to make. I am so glad to have these in my life now and hope you enjoy them as well. Try different spices and savors to get them just how you find them perfect.
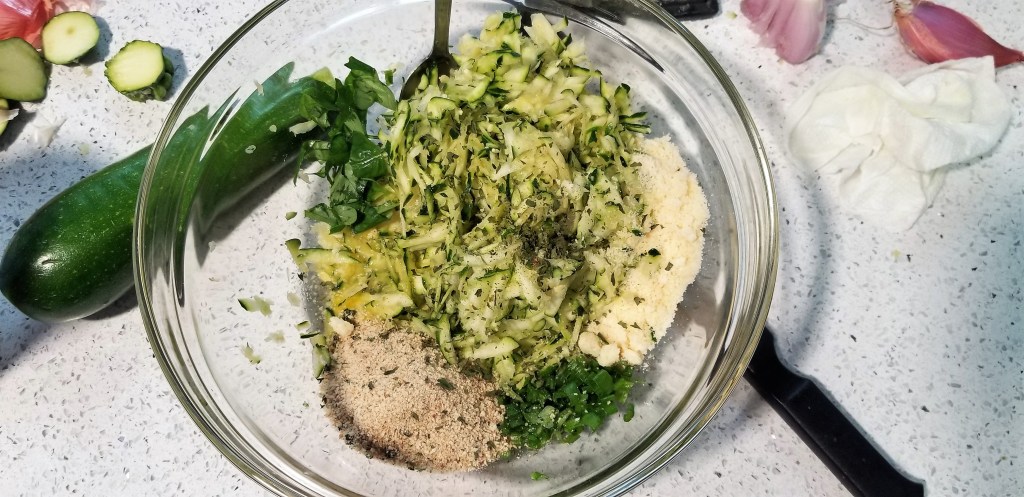
Take-Home Tips: It is important to get these very dry, but they will still somehow (I blame the egg), be soaked in liquid when you mold them. I added a little extra breadcrumbs to this recipe for you to help with the moisture. I could see some nutmeg being a good addition to these. On that though, be careful adding extra wet ingredients, such as the shallots or onions. It would be best to dry those as well. No need to cook them beforehand though. They cook through batter if they are not too big, but rather small and flat, like rösti or tatter tots.
Dinner is ready!
Scoring: 8 of 10. Almost perfect! Not too difficult to make, but my complaint would be that it does not make enough. You would need to double the recipe for more than 2 people. It can be a bit much for a side dish, but they really are yummy. If you make more than 2 zucchini (<8 inches each), you will also need to increase the other ingredients. The first batch I give a 10 of 10 to, but the second batch had too much zucchini with 3 large zucchini. The powdered cheese is a crucial part of this recipe.
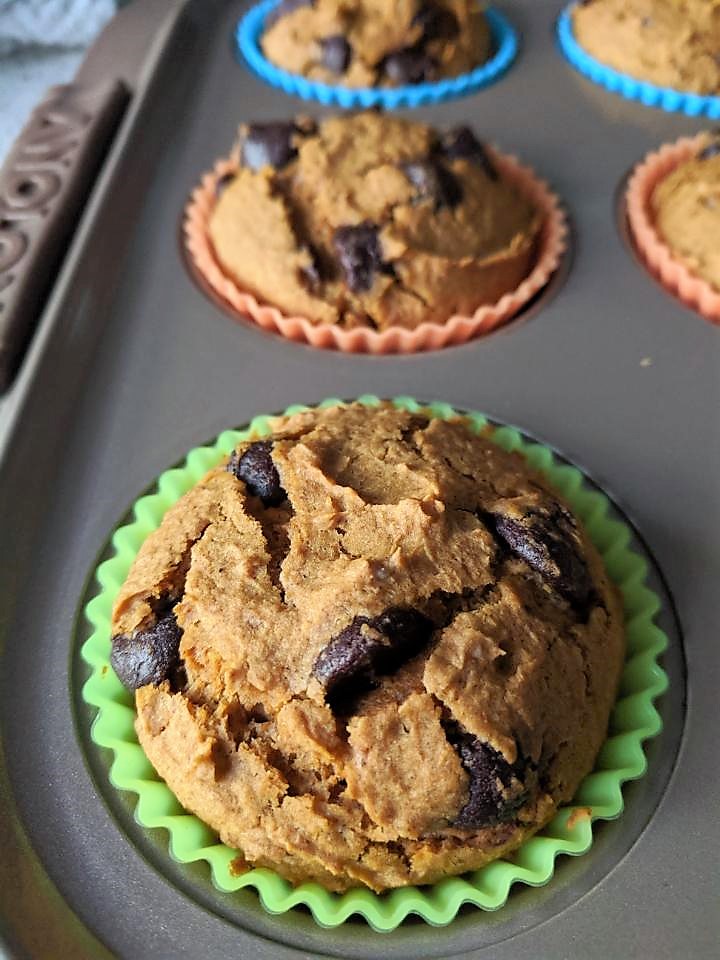
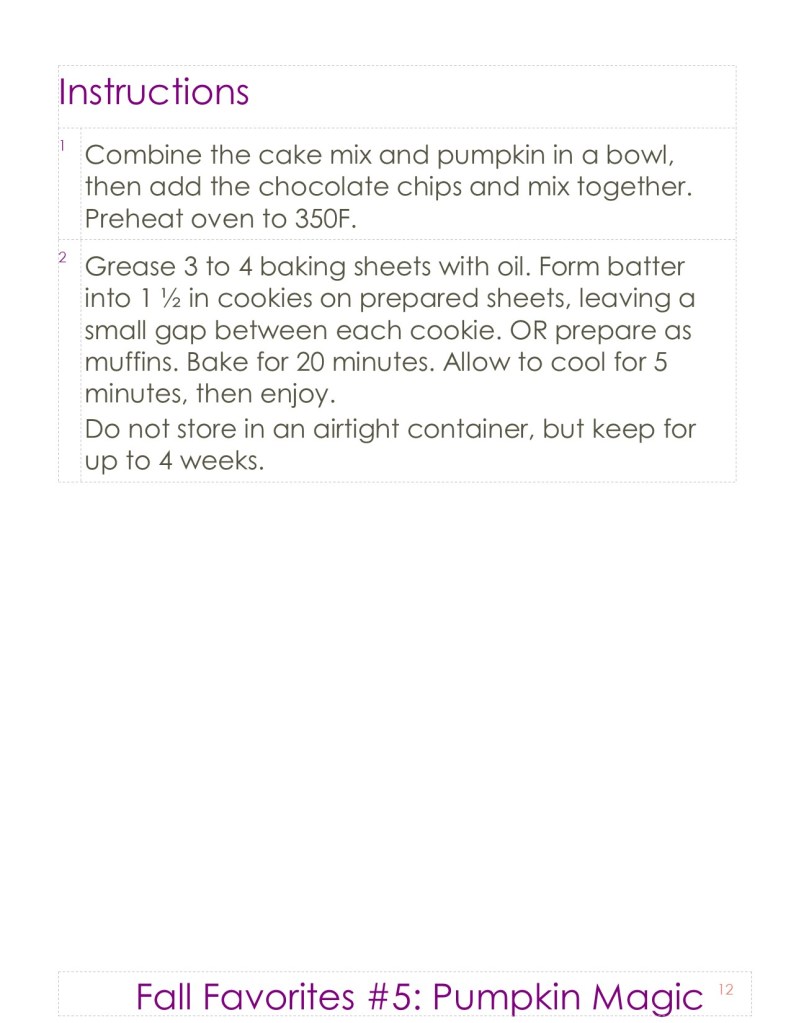
The perfect fall treat. These 3-ingredient magical cookies leave nothing to be desired. They are so easy to make, if it is your first time using an oven you will still succeed. My husband is not a fan of pumpkin and still devours these cookies. He even made several batches himself to take to work, and I can rarely convince him to bake. He did not even ask for my help.
Believe me when I say these cookies are magical. If you find someone who does not like them, let me know because I have not found anyone who can find fault in them. Did I say cookies? You can make these into muffins or whatever your heart desires. Note though, that whatever shape they are in when they go into the oven, they will come out with almost exactly the same silhouette.
We have made about 6 batches of these this month. There were muffins, mini cookies, regular cookies, ones with vanilla cake mix, ones with pumpkin spice puree, and who knows what else. We continue to agree that the plain pumpkin puree with the spice cake mix and dark chocolate, or even the semi-sweet morsels, make the best combination.
The challenge lies in convincing your friends and family that they will not need any butter, eggs, or other ingredients to make these magic cookies. Anything extra is for your personal enjoyment, but not necessary.
Happy Fall!
Take-Home Tips: If you make into any shape other than cookies, note that the batter does not move from the shape it is in when you place it in the oven. It will not flatten or expand to fit the container it is in, so you need to spread it how you want it to look before baking. Consider scooping them out of the bowl with an ice cream/cookie scoop into your muffin tin or cups. I find this helps with the smoothness of their shape. I have tried all the different morsel varieties and even though dark chocolate is not my go-to, it is the best for these cookies. Other possible ingredients: rolled oats, crushed nuts, or a Hersey’s kiss in the shape of a thumbprint cookie.
Scoring: 10 of 10. I only made these for the first time last year, but cannot get enough. A friend asked for a recommendation for a quick, easy treat to make for a party, I suggested these Pumpkin cookies. Not only was she ecstatic about them, she agreed the recommendation could not have been more spot on. The only trouble is when I explain how to make them, no one believes it is that easy. I worry they will add extra ingredients like eggs or oil and ruin the batter. Once you have tried these, you will tell everyone you know.
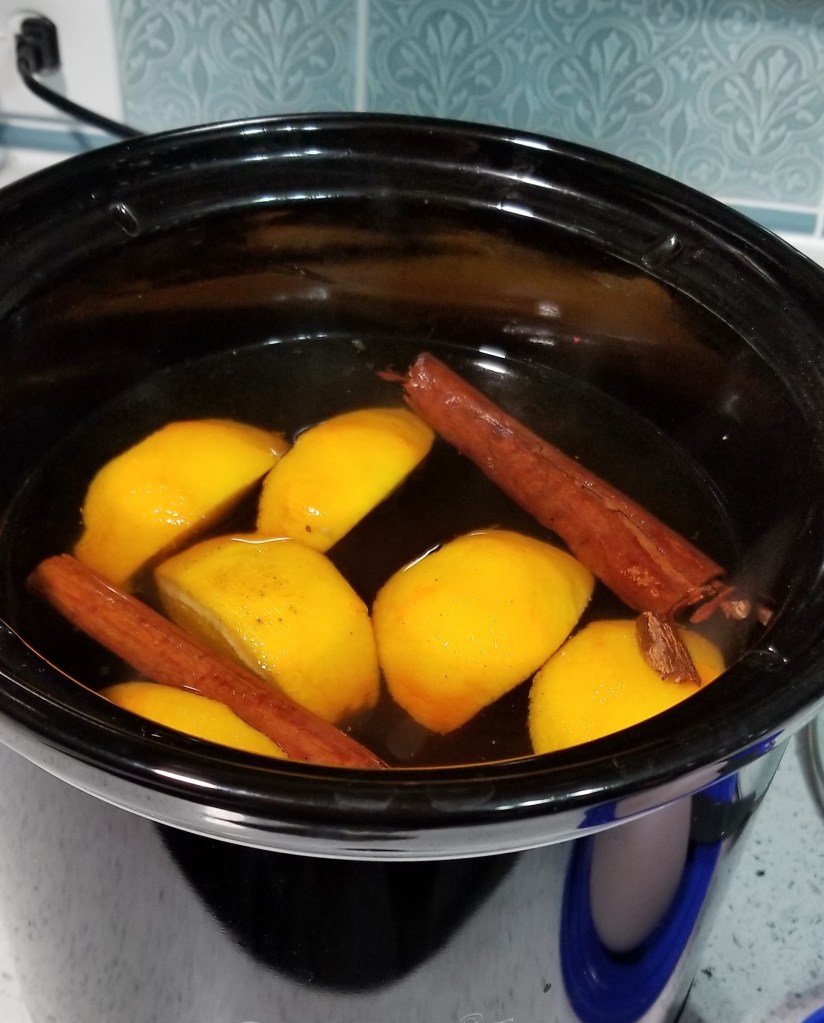
When the season is changing and bringing us chilly weather, a warm beverage is just the thing we need. This tea infused cider is a great way to consume extra needed nutrients and spices to ward off a cold. Let your favorite citrus or ground spice teas to boost your immune system and improve your health. Check out Countertop for more information on which spices are good for your needs.
To make apple cider from apples, bake a variety of apples until soft. A mixture of sweet (Fuji and Honeycrisp) and tart apples (Granny Smith and Braeburn) creates a well-balanced flavor. Next smash them with a potato masher (or similar tool) and add them to the Crock-pot as the “cider”. Continue with the rest of the recipe. If a Crock-pot is unavailable, you can always bring the apples and water to a simmer, covered. Cook for 1 hour, stirring occasionally. Then smash the apples, add the spices, and continue to simmer for another hour.
Take-Home Tips: For each tea bag you add, increase the brown sugar by 1 tablespoon and the water by 1 cup. The recipe is written for 1 tea bag. I would not recommend white sugar or other sugar substitutes, except potentially molasses, due to the other ingredients involved. Lemons are a great substitute if you would prefer them over the orange. Serve with a slice of orange.
Scoring: 9 of 10. For someone who did not expect to enjoy this, I really did like it. It is warm but does not warm the bones like hot cocoa does, so it is okay for warmer days too. Similar to a really good tea, I would recommend adding more tea ingredients to make it healthier. It is sweet even after watering it down. A nice treat on a cool day.
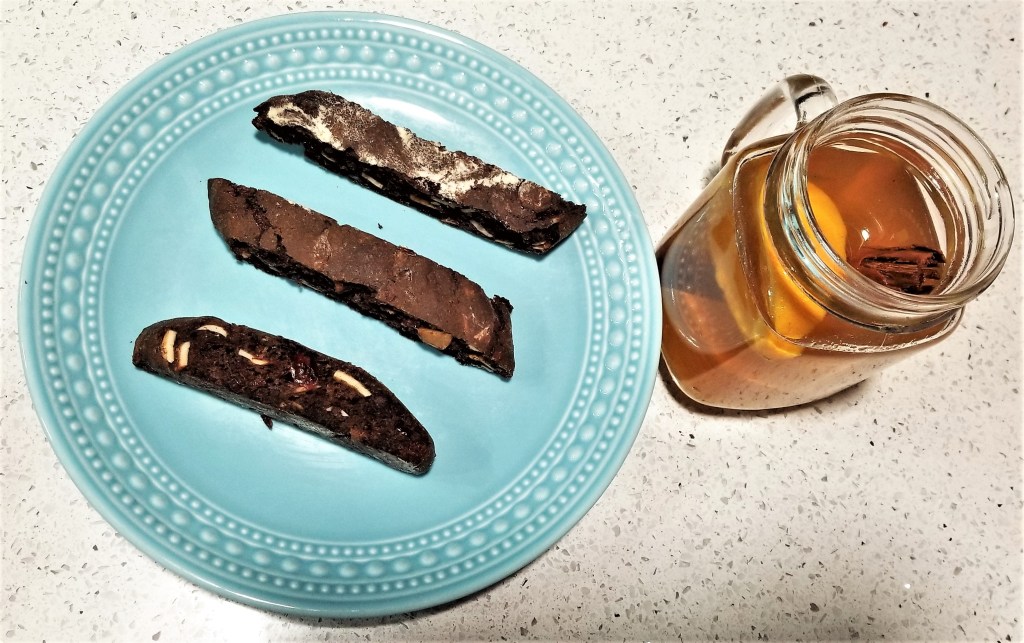
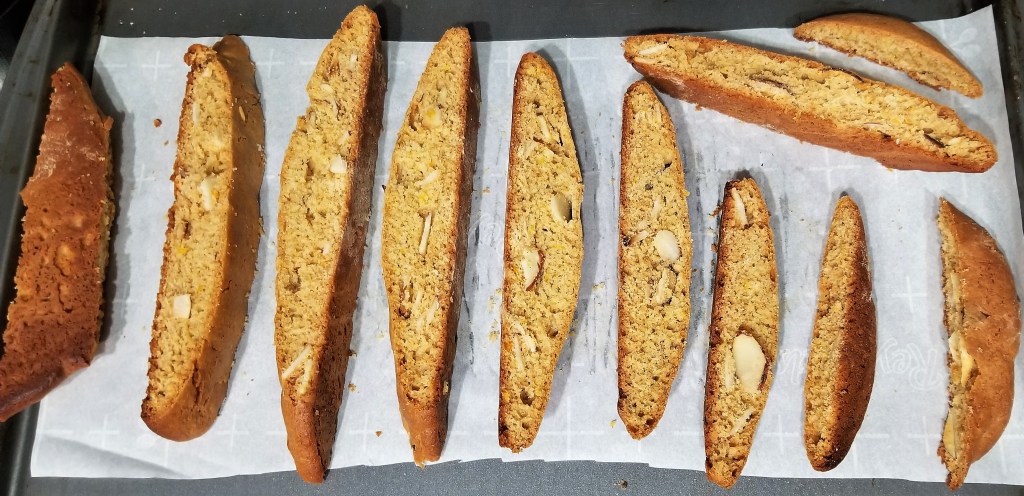
Dark Chocolate Almond Biscotti with Warm Spiced Apple Cider
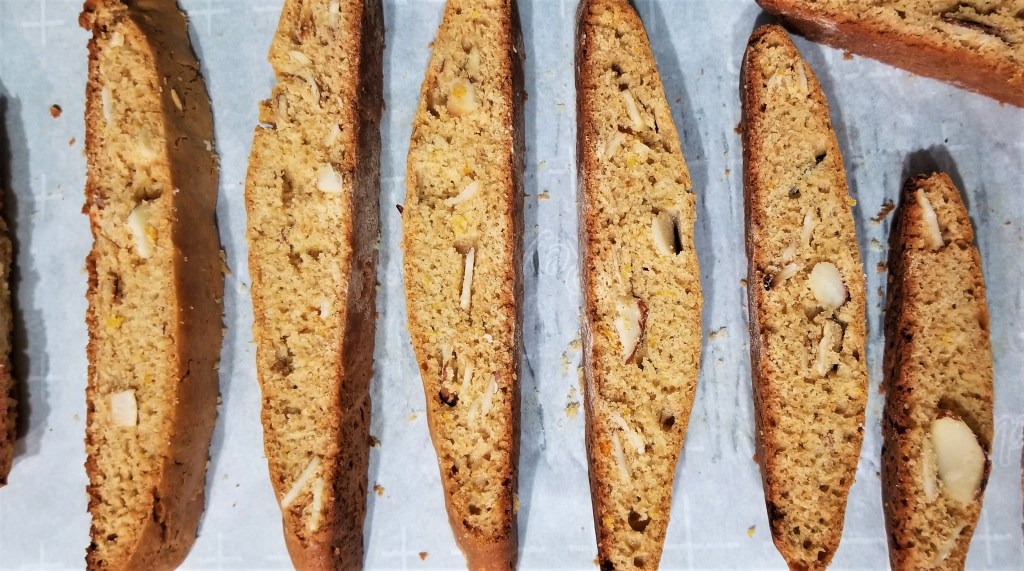
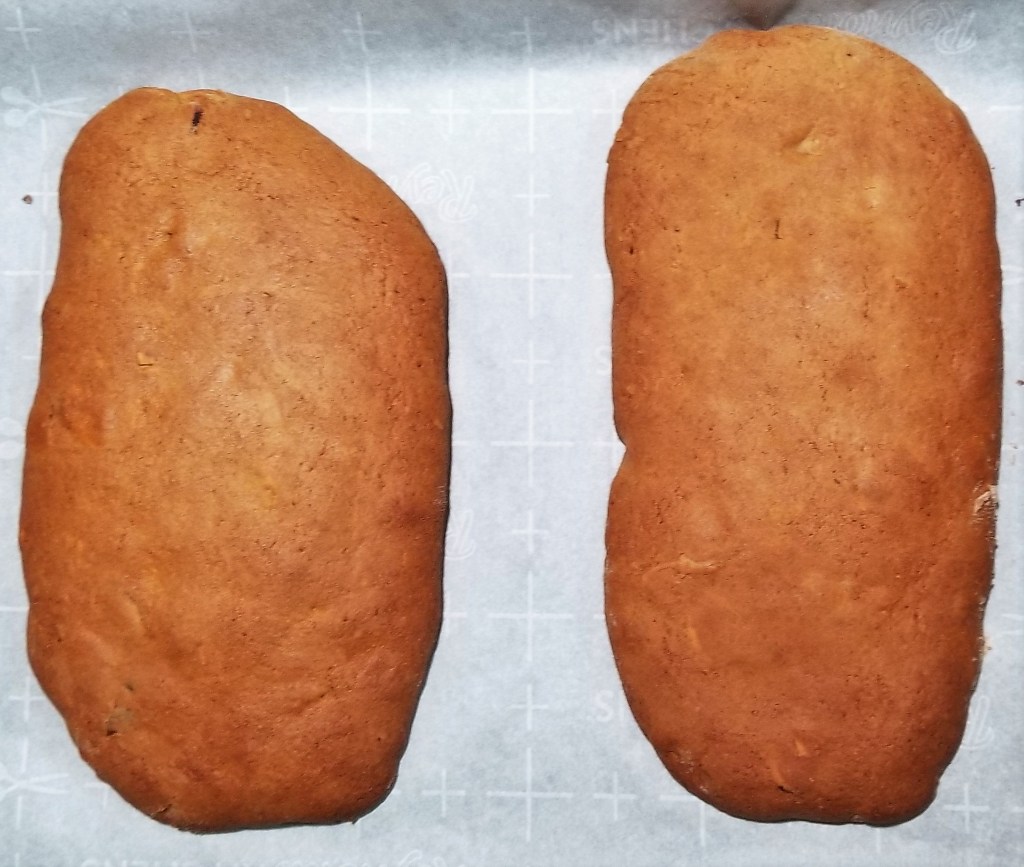
There are so many heavy pumpkin spice flavored desserts and foods this time of year. Our fall favorite’s list would not be complete without a pumpkin spice biscotti. Secretly, the reason I wanted to learn how to make biscotti was to create a pumpkin flavored one. This is not a typical biscotti flavor, however it is a typical fall flavor.
Shaping with no edges.
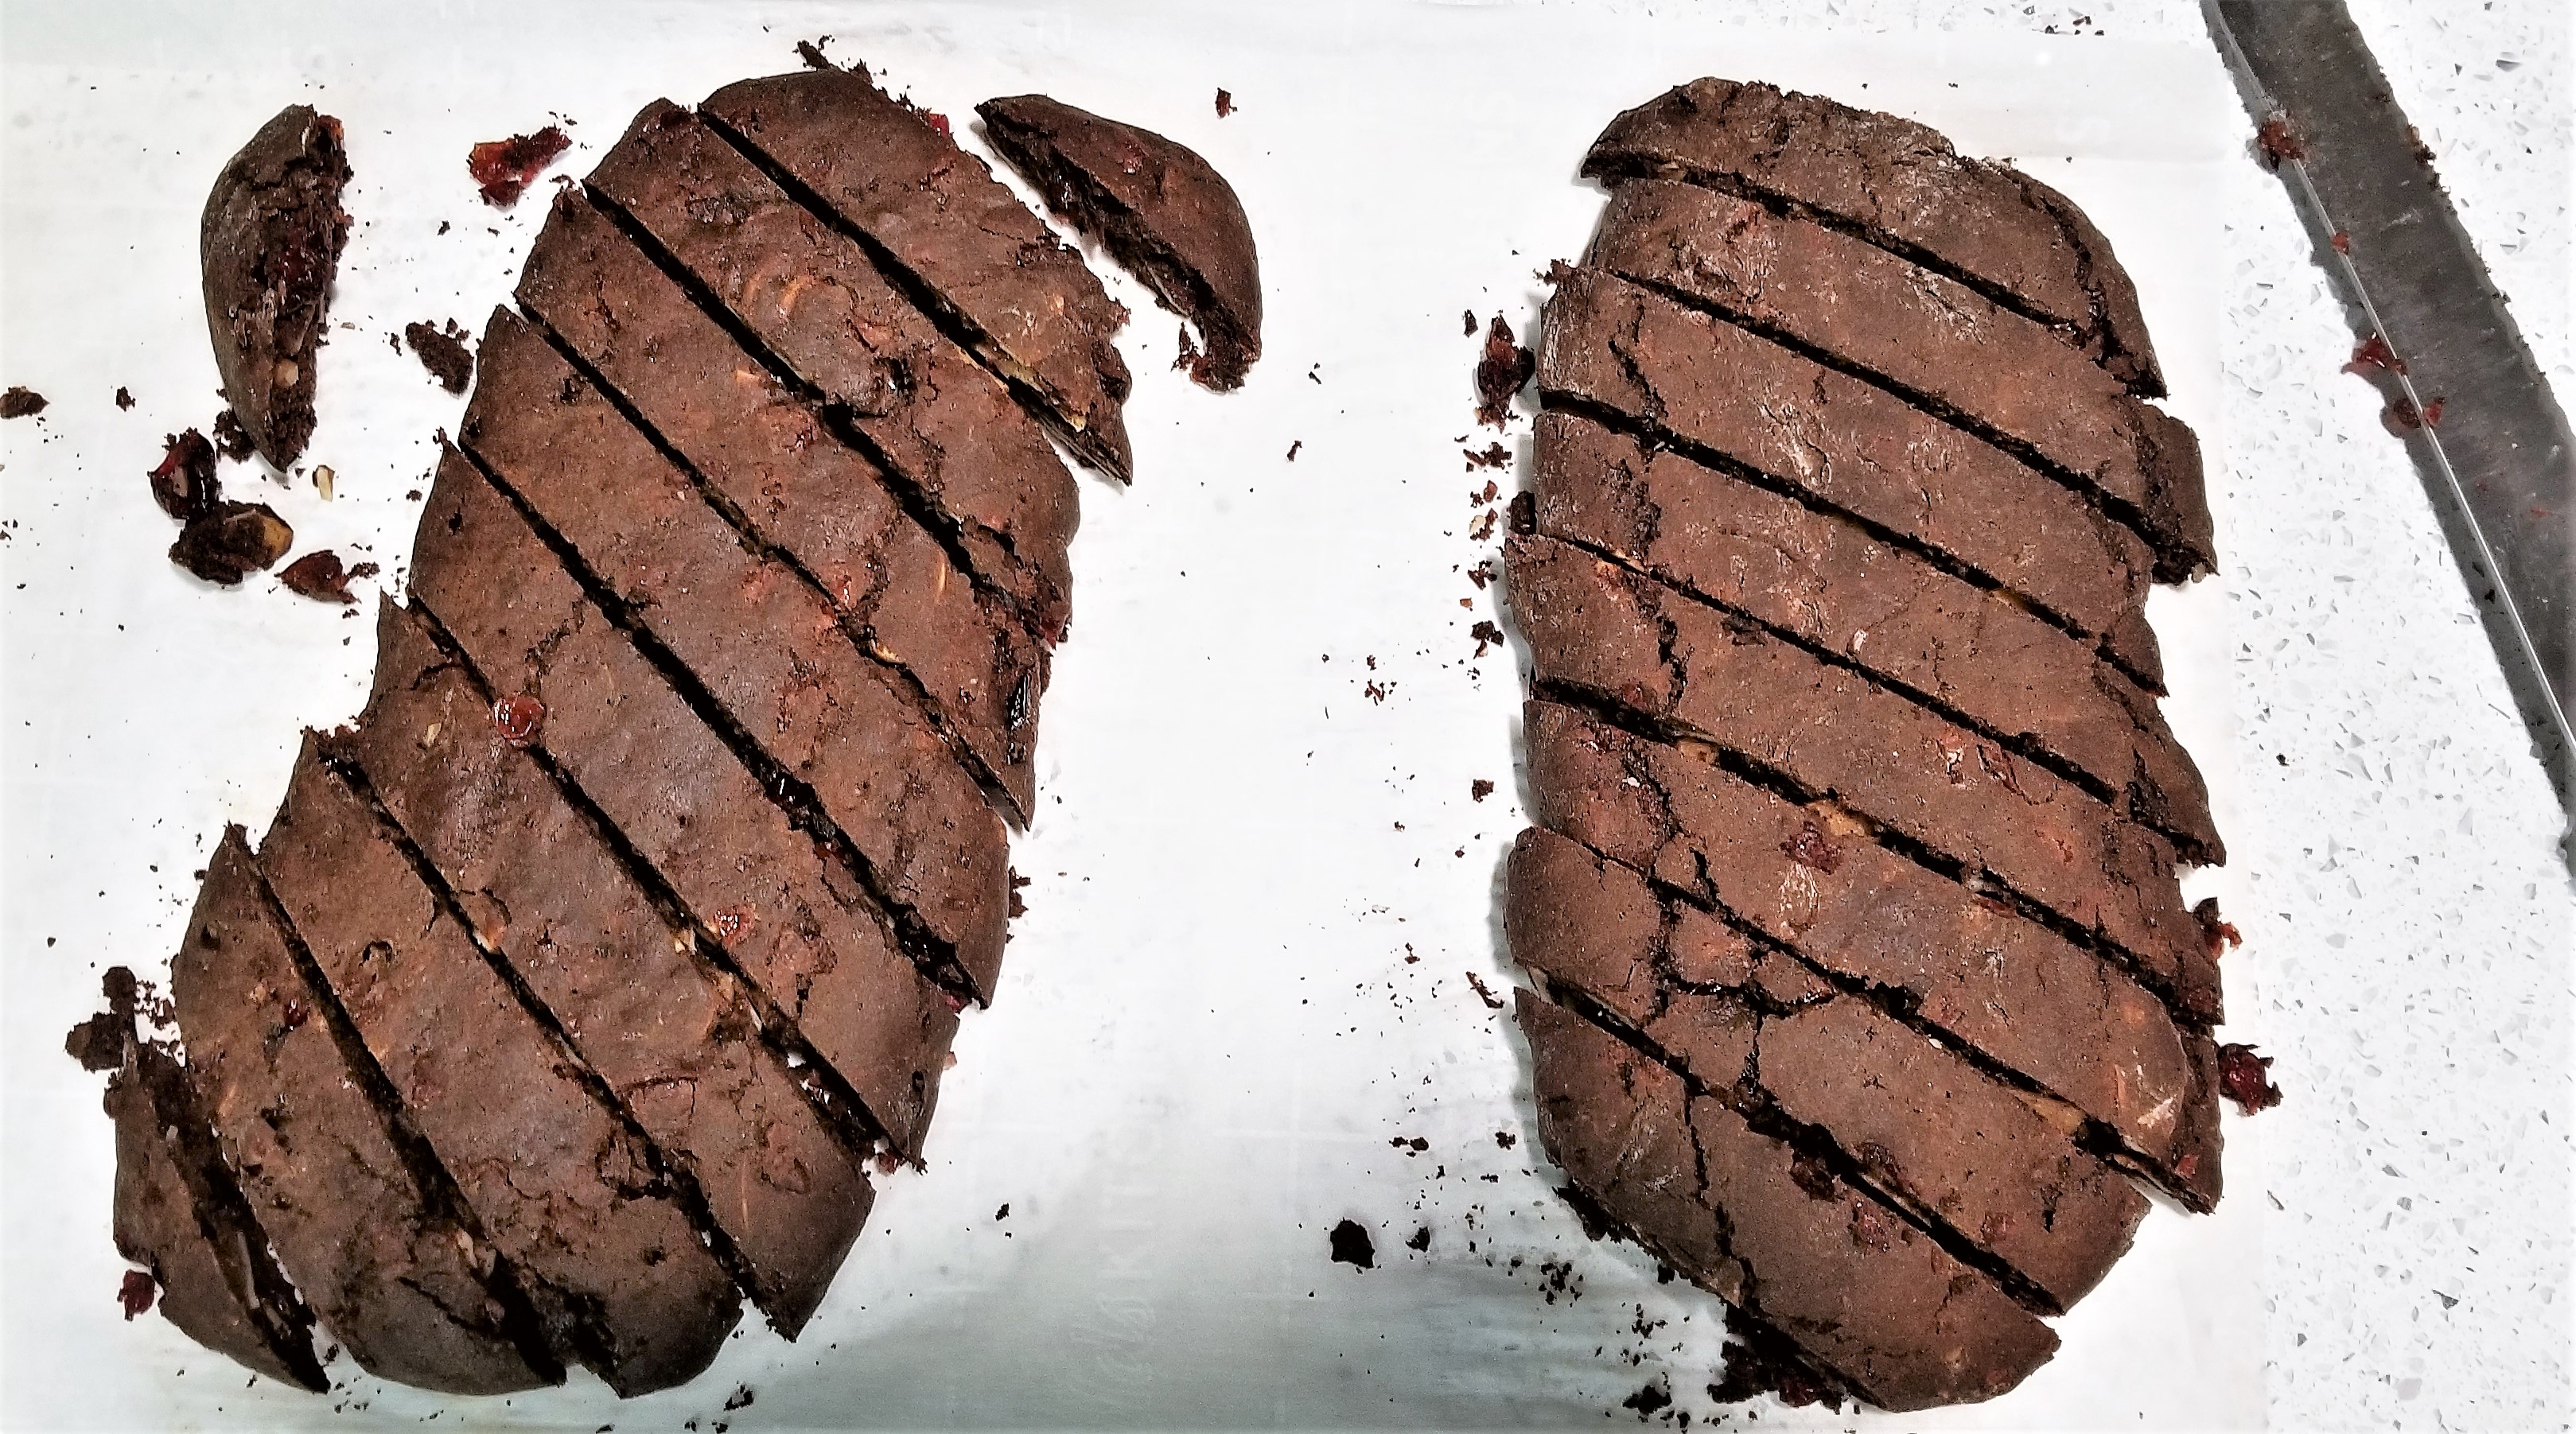
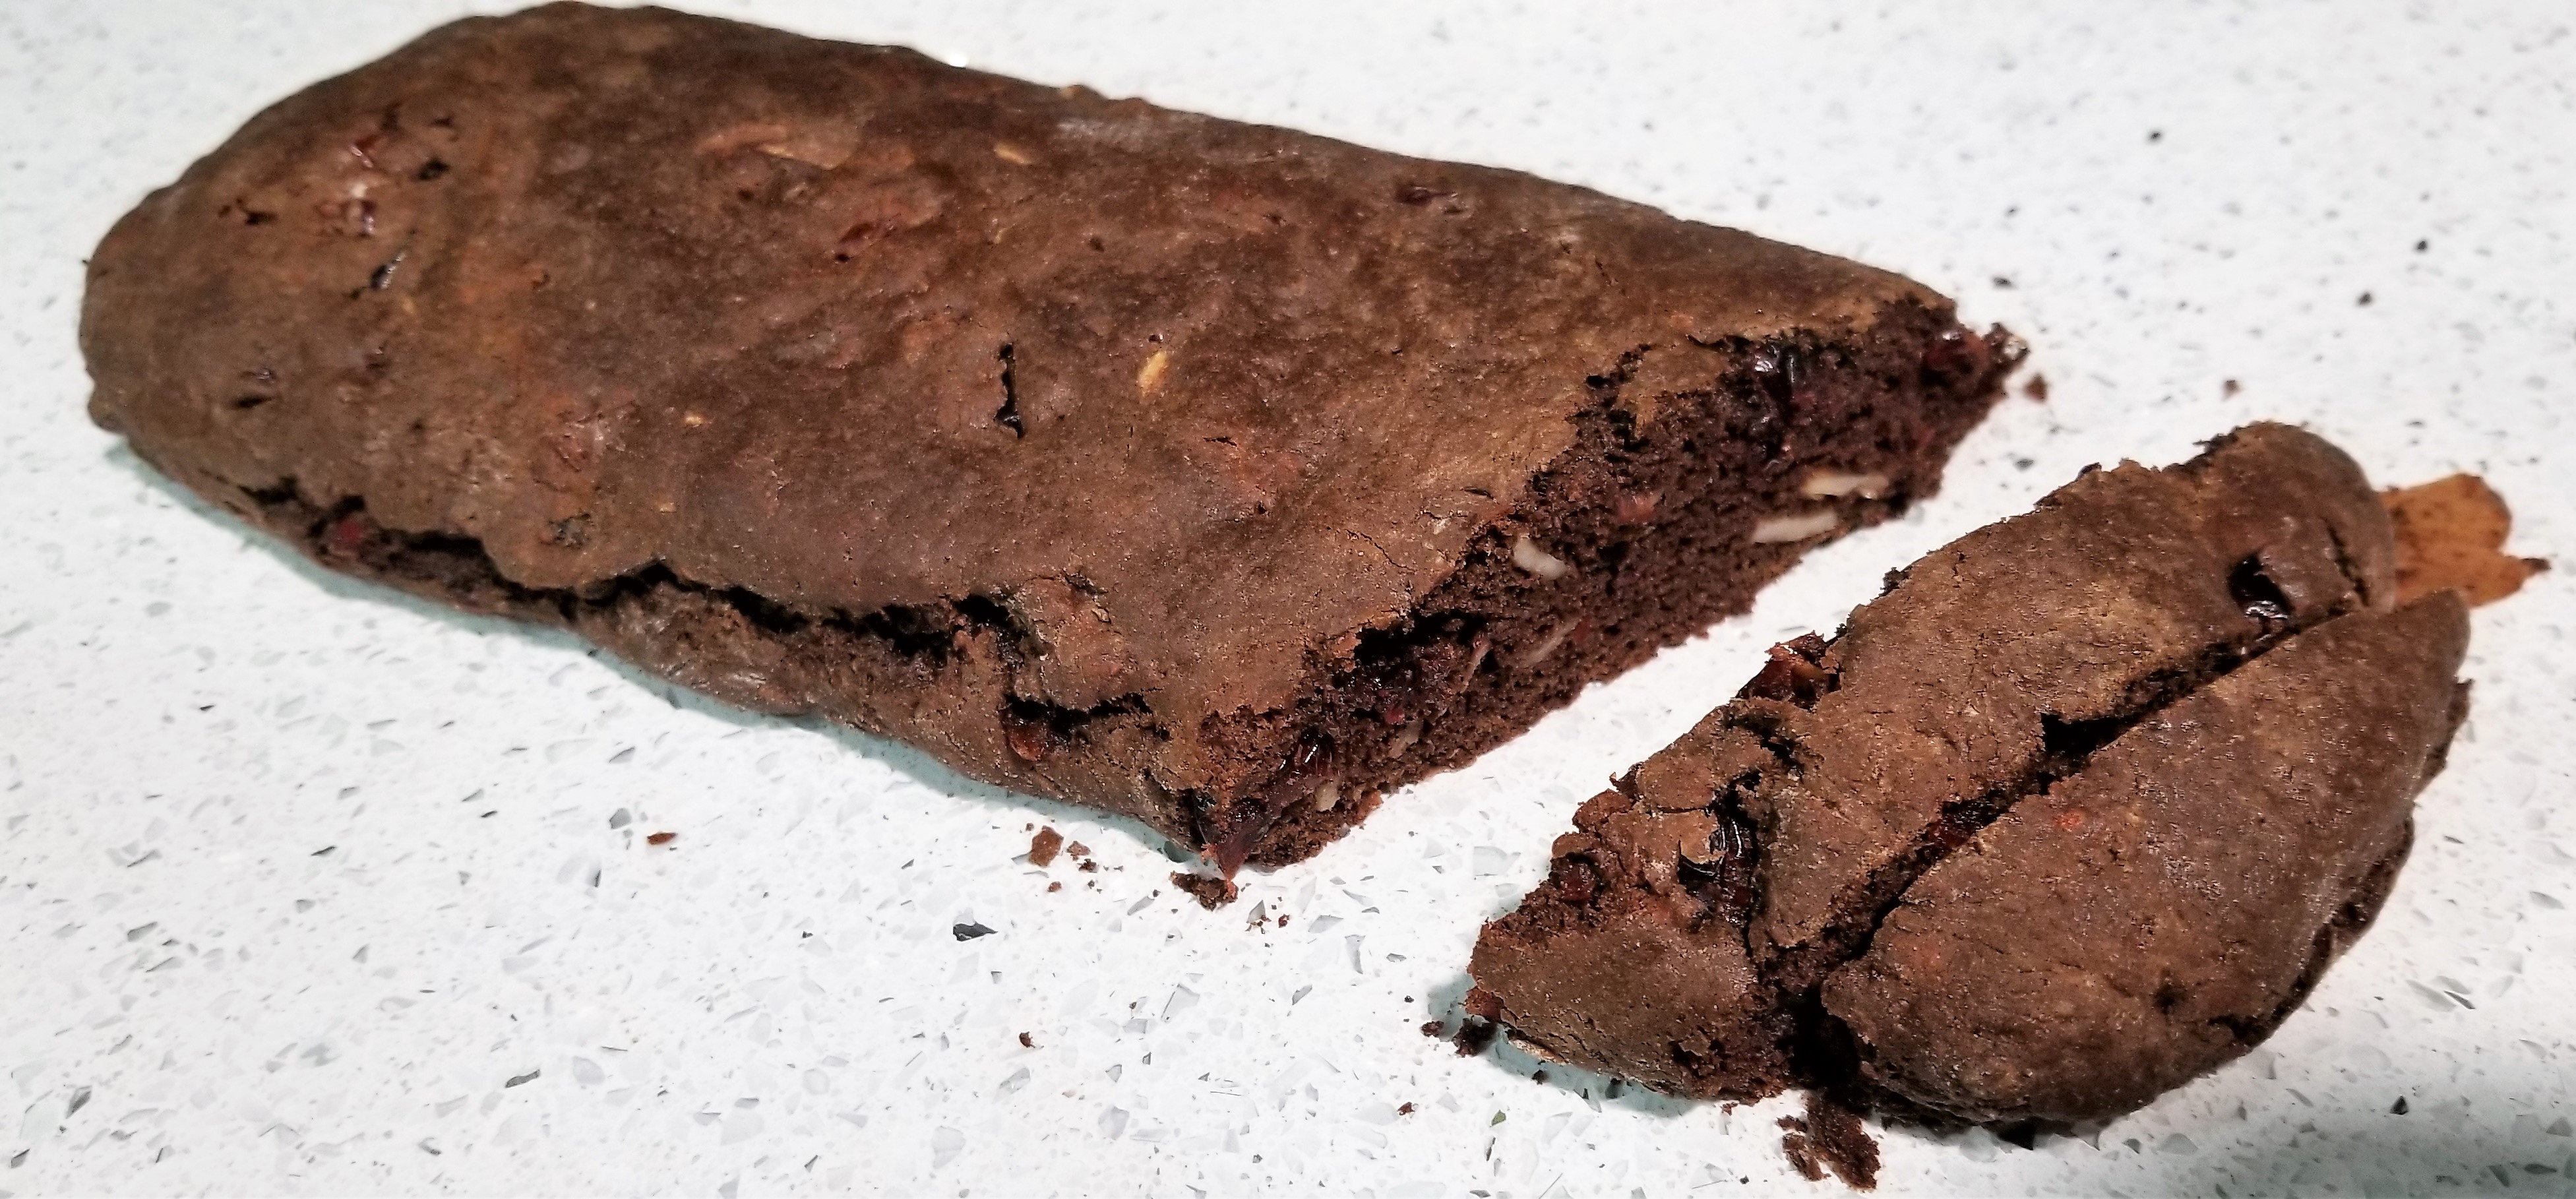
If you have not yet tried my other biscotti flavors, you are missing out on the traditional biscotti with almond and anise as well as the dark chocolate almond with dried cranberries.
Left one after baking with no edges.
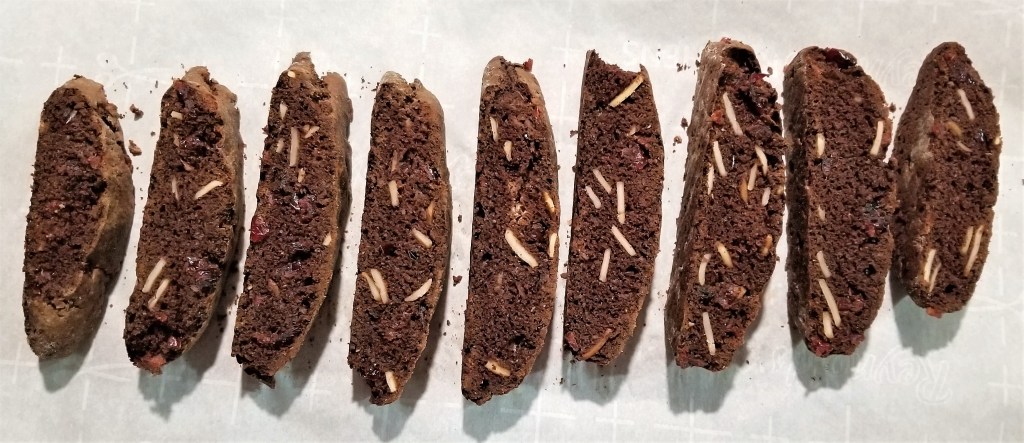
This is 100% the best biscotti flavor yet! The other ones were good, I really enjoyed them. However, the pumpkin was everything I hoped it would be, and more. I would not let my husband and brother have any of this one. It is all for me! Sorry, but I am only willing to share the recipe at this point. I have already made a second batch for my Fall (Pumpkin) Biscotti Gingerbread House – sneak peek! stay tuned for that adventure.
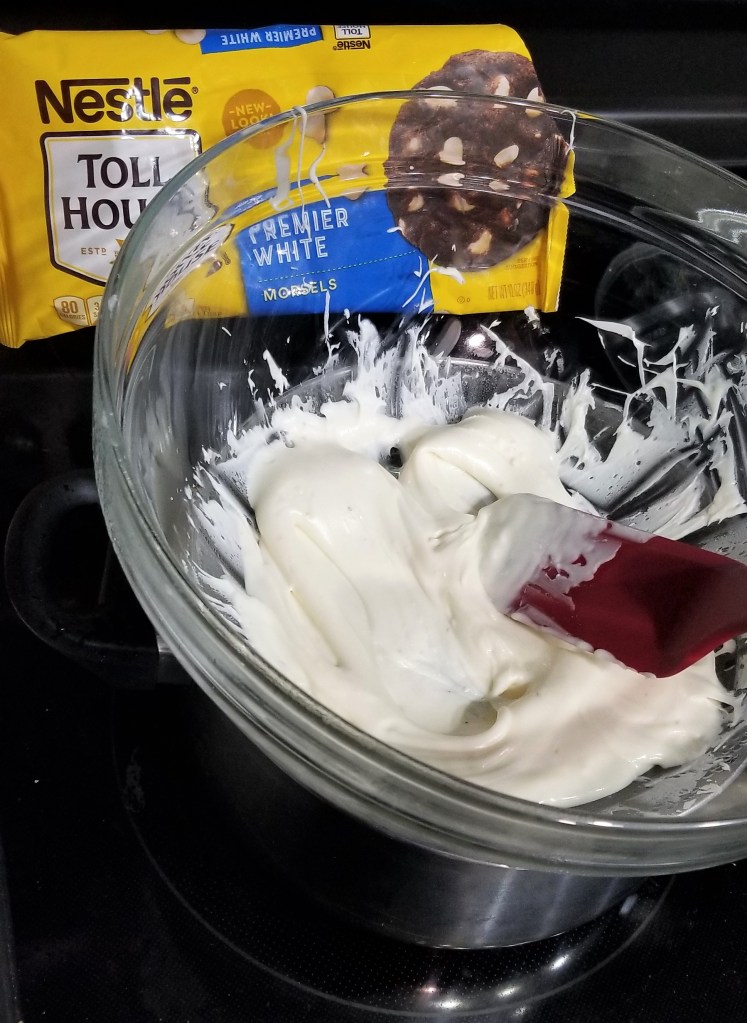
Cover in white chocolate!
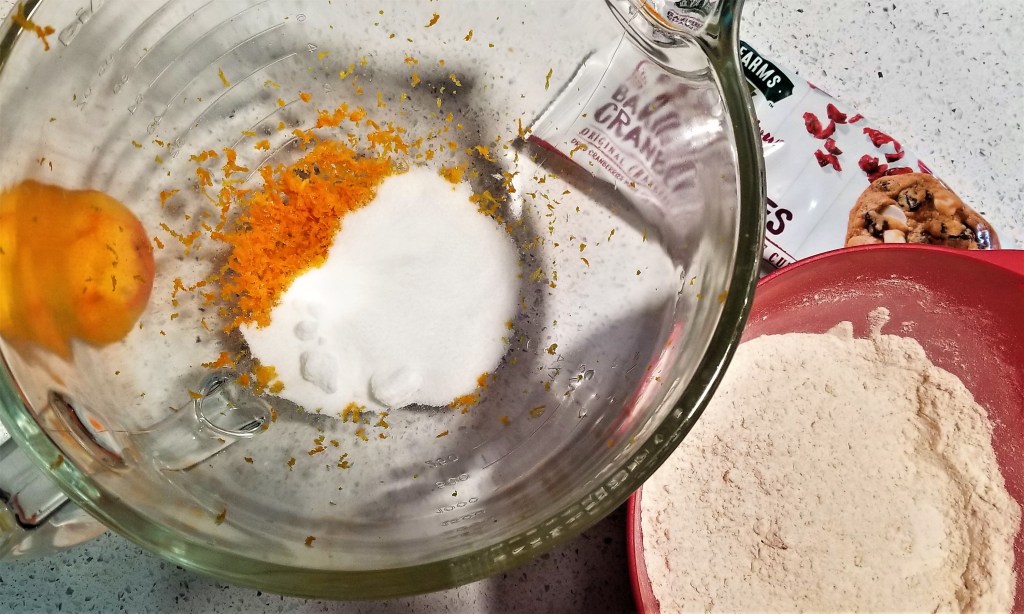
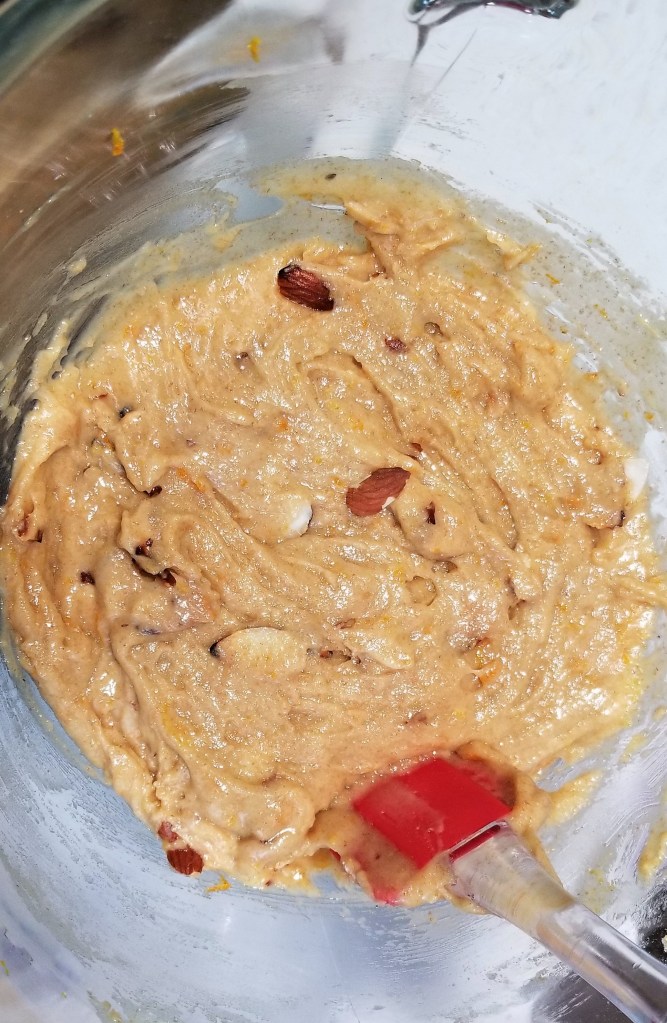
Take-Home Tips: You can add all the classic spices to encourage the pumpkin flavor you know any love, such as pumpkin pie spice, cloves, allspice, cinnamon, nutmeg, cardamom, etc. This is definitely a sticky dough. Be sure to four your surface very well, and even your spatula to move the shaped dough to the baking sheet. If you shape the dough on the parchment paper you will bake on, then you can avoid this transition where the dough can be malformed. Use a rolling pin for an even top, however it is likely the dough will rise as it desires in the end. Because I knew I was going to cut my dough diagonally, I went ahead and shaped one of the halves of dough without edges so I would waste less real estate in the corner space.
Scoring: 10 of 10! I really think this one is the best yet. My team at work asked for seconds, even though I explained I wanted to keep them all to myself – ha! Of course I shared, because they are too good not to. I hope you make them and share with someone you care about. Fall biscotti success.
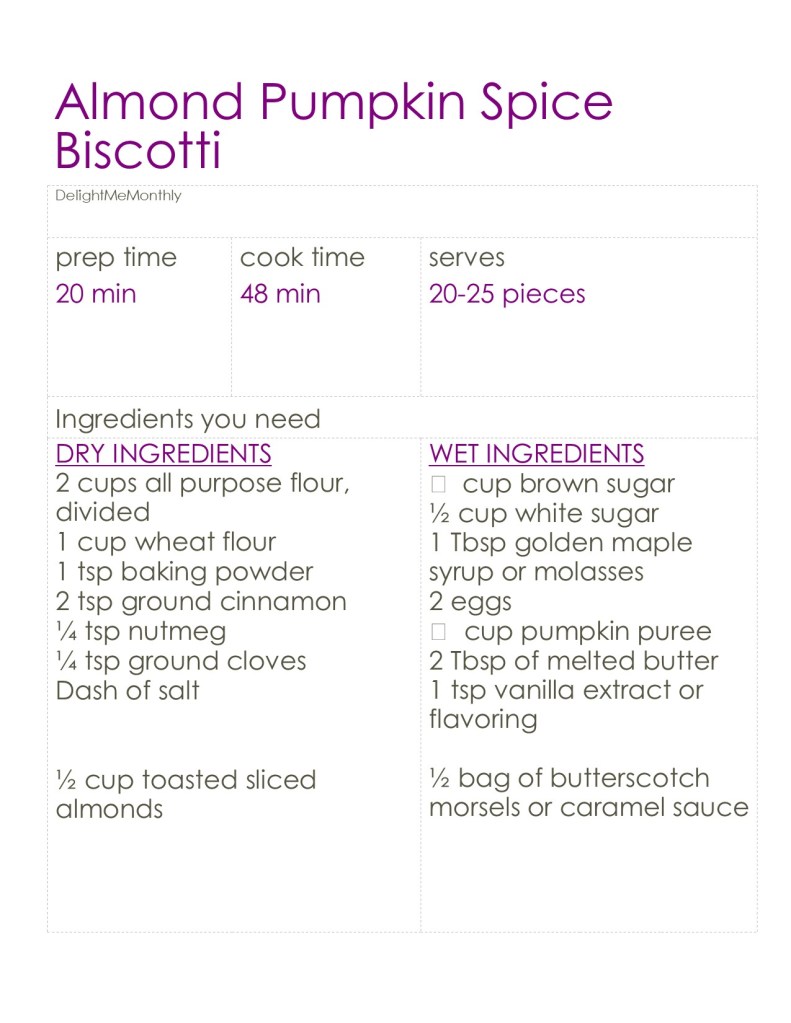
The missing measurements in the squares above are 1/3 cups of brown sugar and pumpkin.
The method employed for this recipe is perfect for all flavors of biscotti. Depending on the level of crunch you desire for biscotti, the time in the oven can be increased to suit all tastes. For a softer, more cookie like consistency, the time on the second bake can be decreased. However if the initial bake is reduced, you will be left with an under-cooked biscotti.
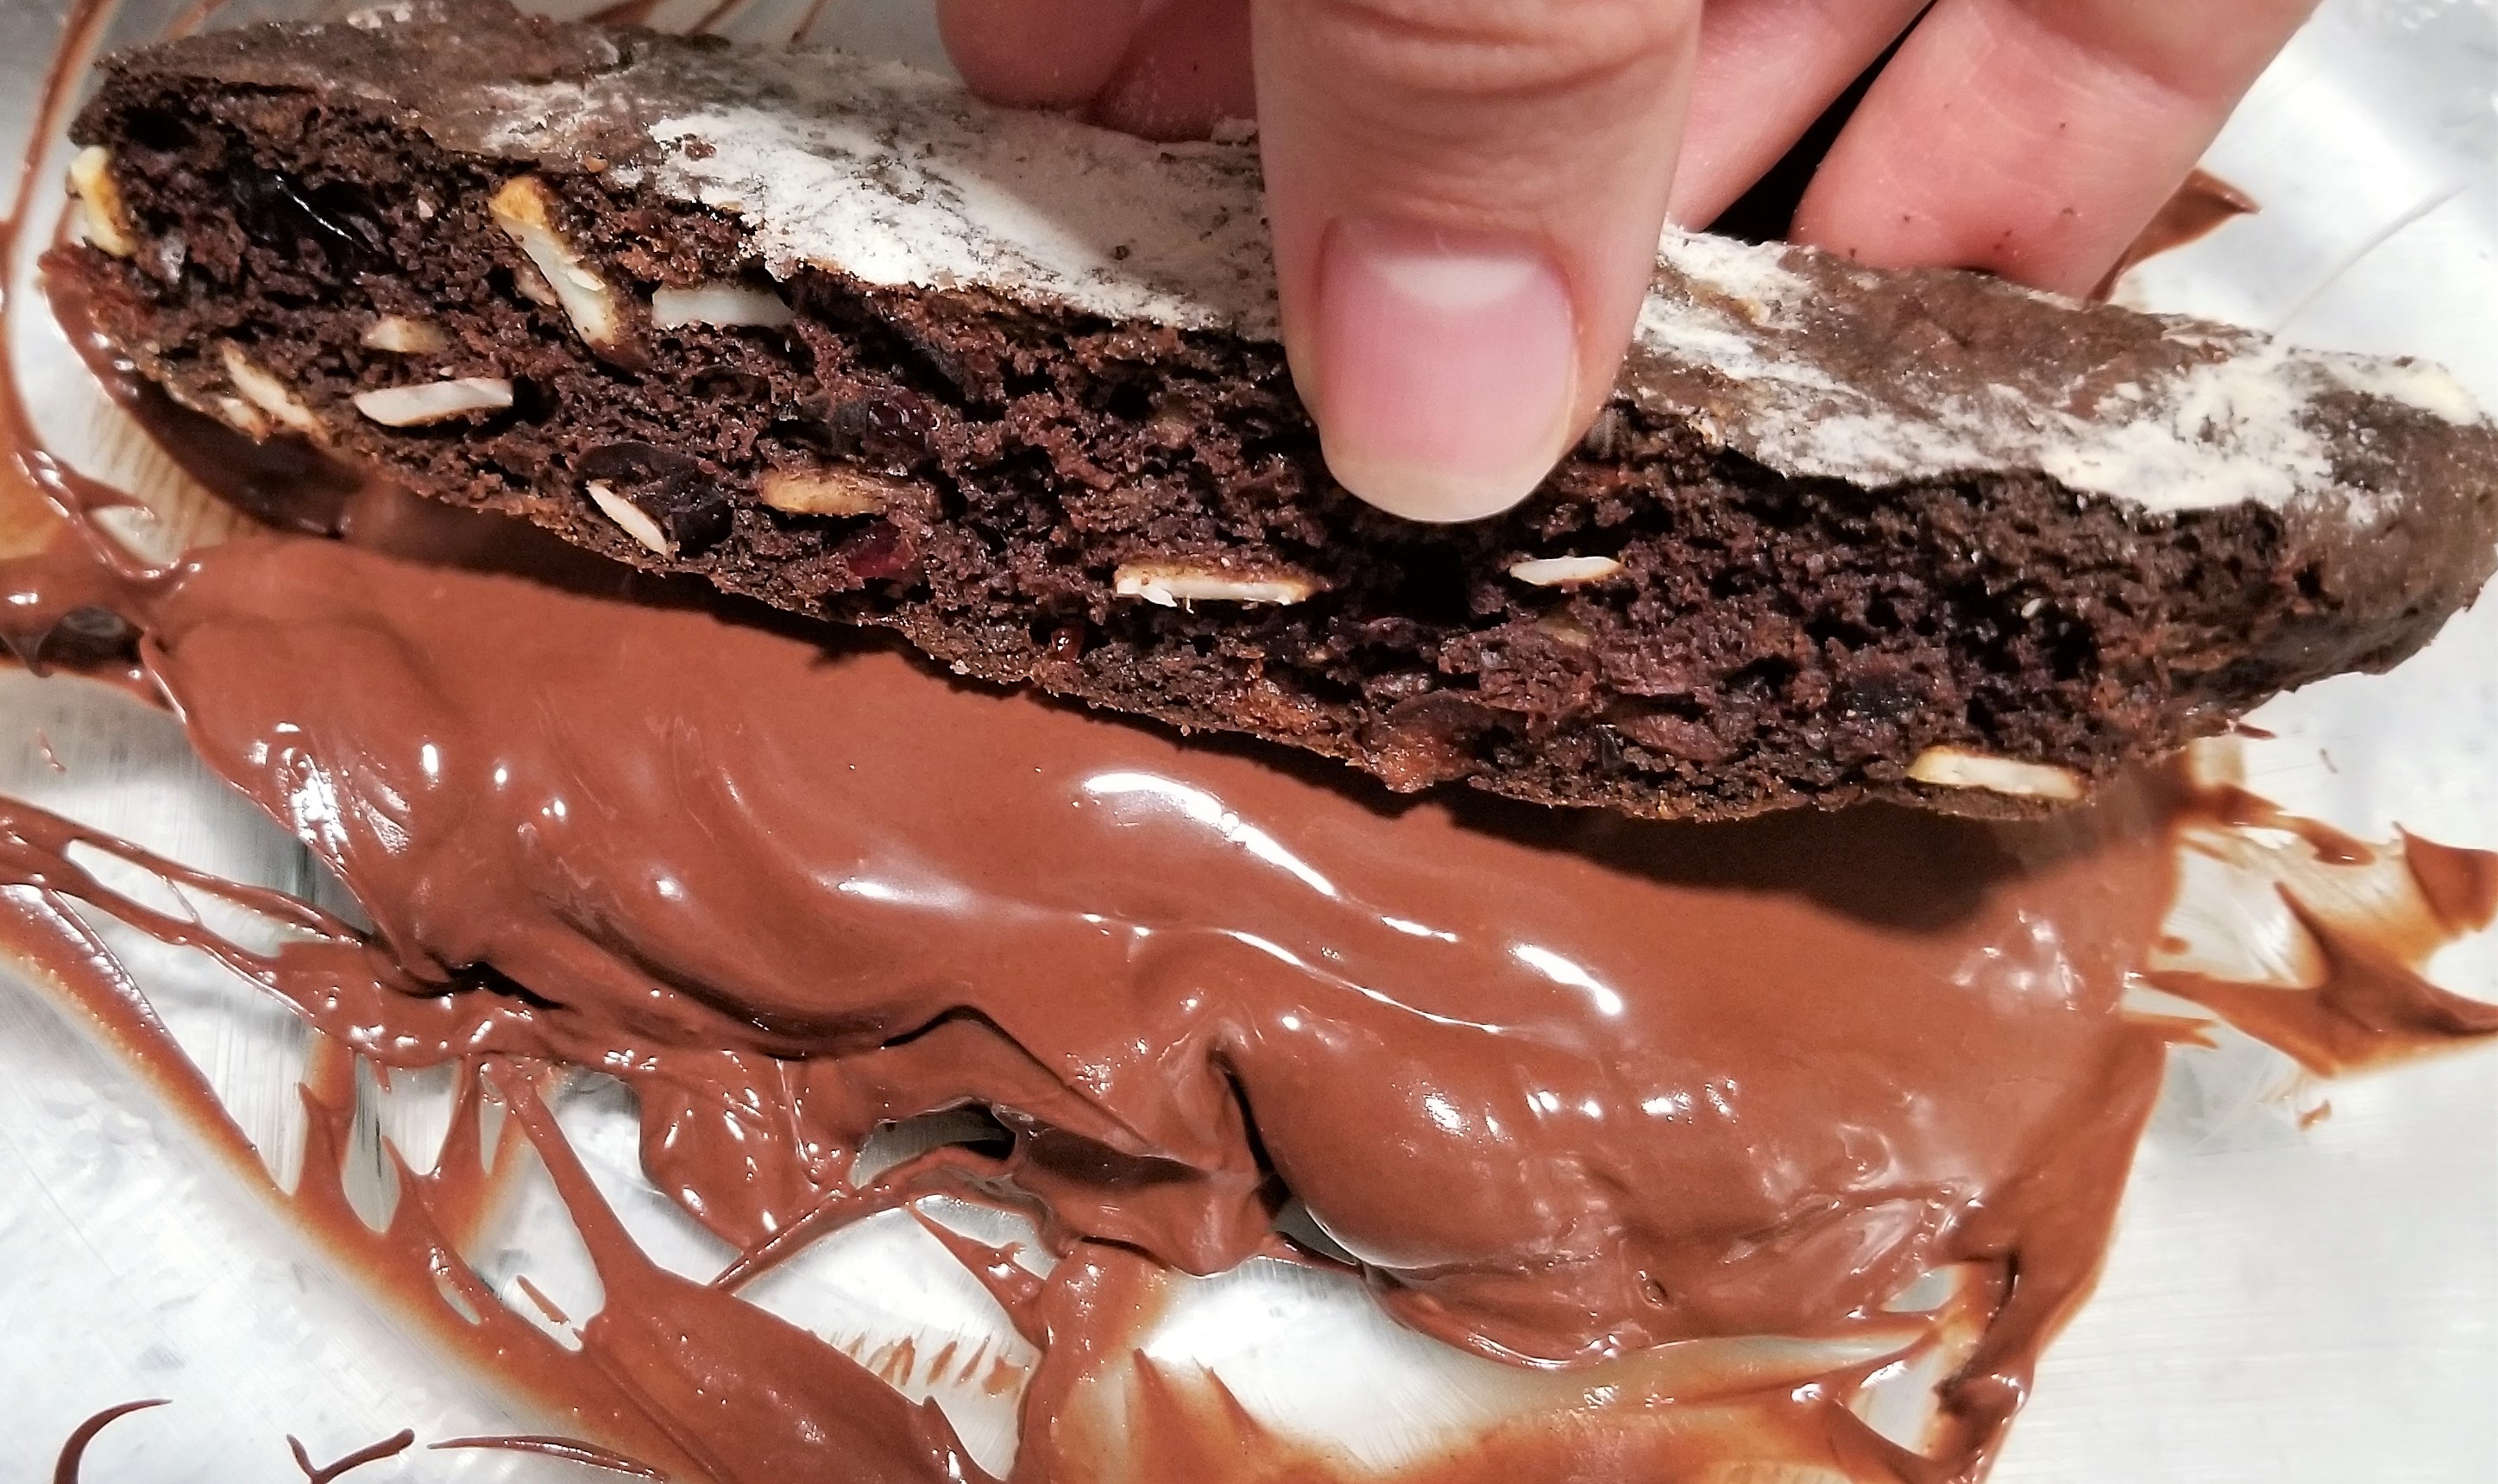
The dark chocolate biscotti could easily be converted into a Christmas treat by sprinkling crushed peppermint atop the ganache before it cools completely. Adding peppermint extract to the dough would also convince your friends this is a wintry snack.
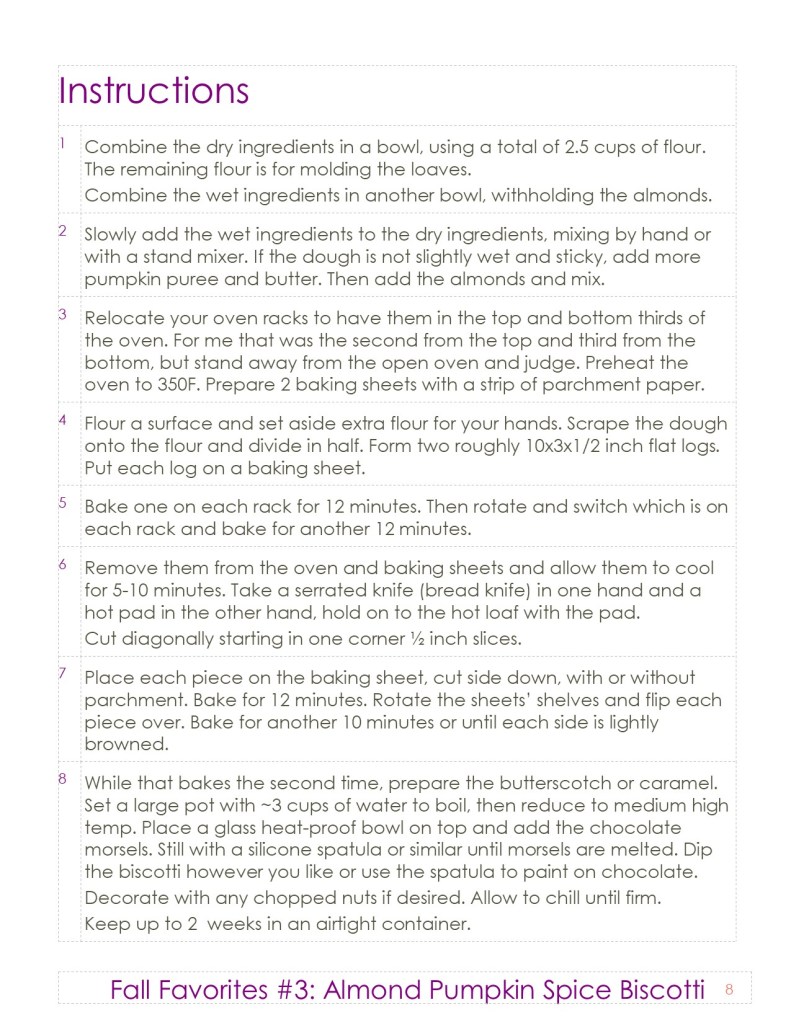
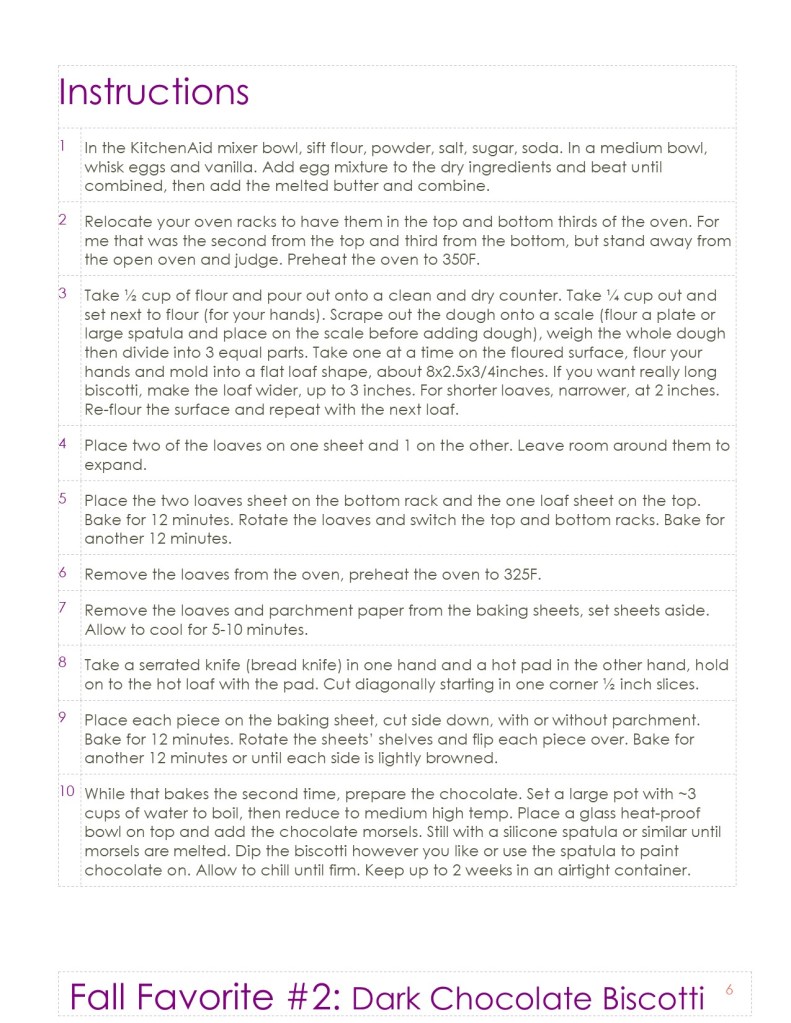
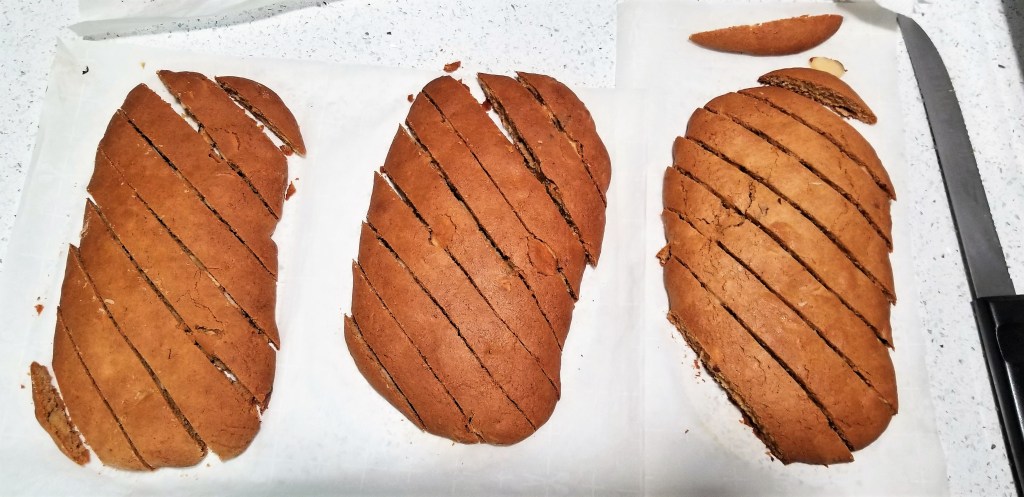
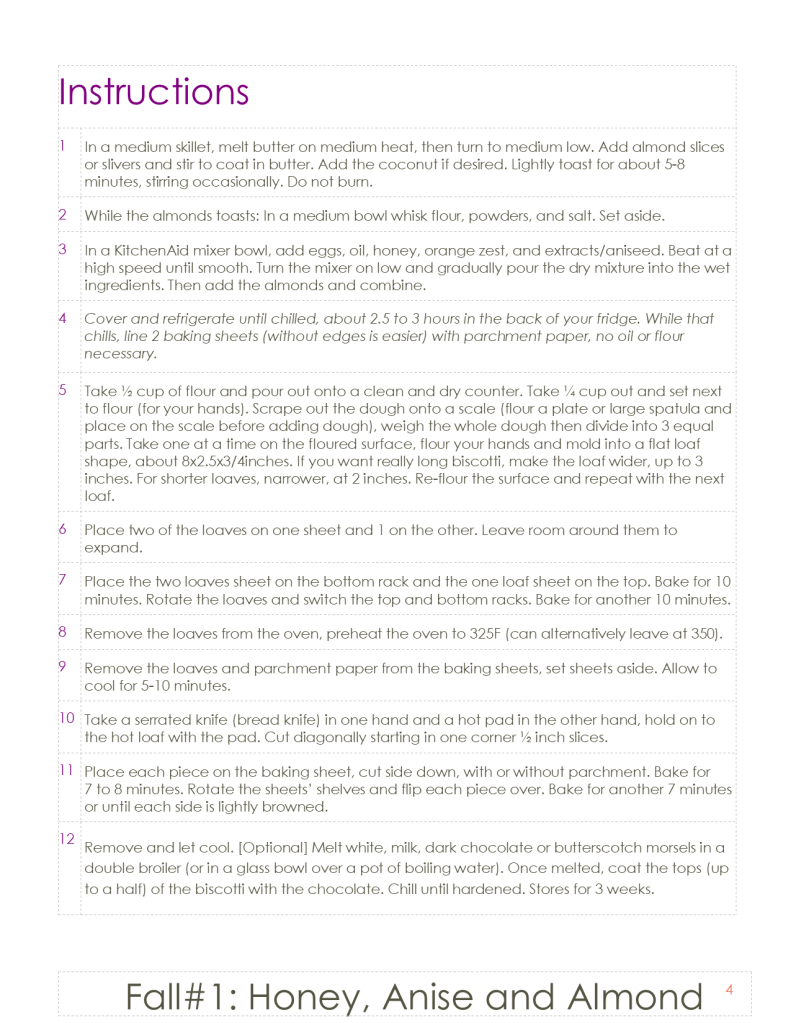
As we are emphasizing Fall Favorites this month, I made 3 kinds of fall themed biscotti for you to try: Honey, Almond, Anise, Dark Chocolate Cranberry Almond, and Almond Pumpkin Spice – of course! I employed the same technique for all three and encourage you to try the baking times and oven rack levels for all your biscotti bakes.
Covered in ganache.
Take-Home Tips: Because the chocolates are so bitter, this biscotti is better enjoyed with coffee, hot chocolate, cider, or ice cream. For a more fall-flavor, try adding cloves or pumpkin pie spice. If you want a more bread-like feel, take the first bake for 2 rounds of 10 minutes and only 2 minutes on each side for the second bake. Note that the loaf will become more firm as it cools.
Scoring: 7 of 10. It is not very sweet and would go better on ice cream. I would recommend a sweeter chocolate, like white chocolate instead of the dark.
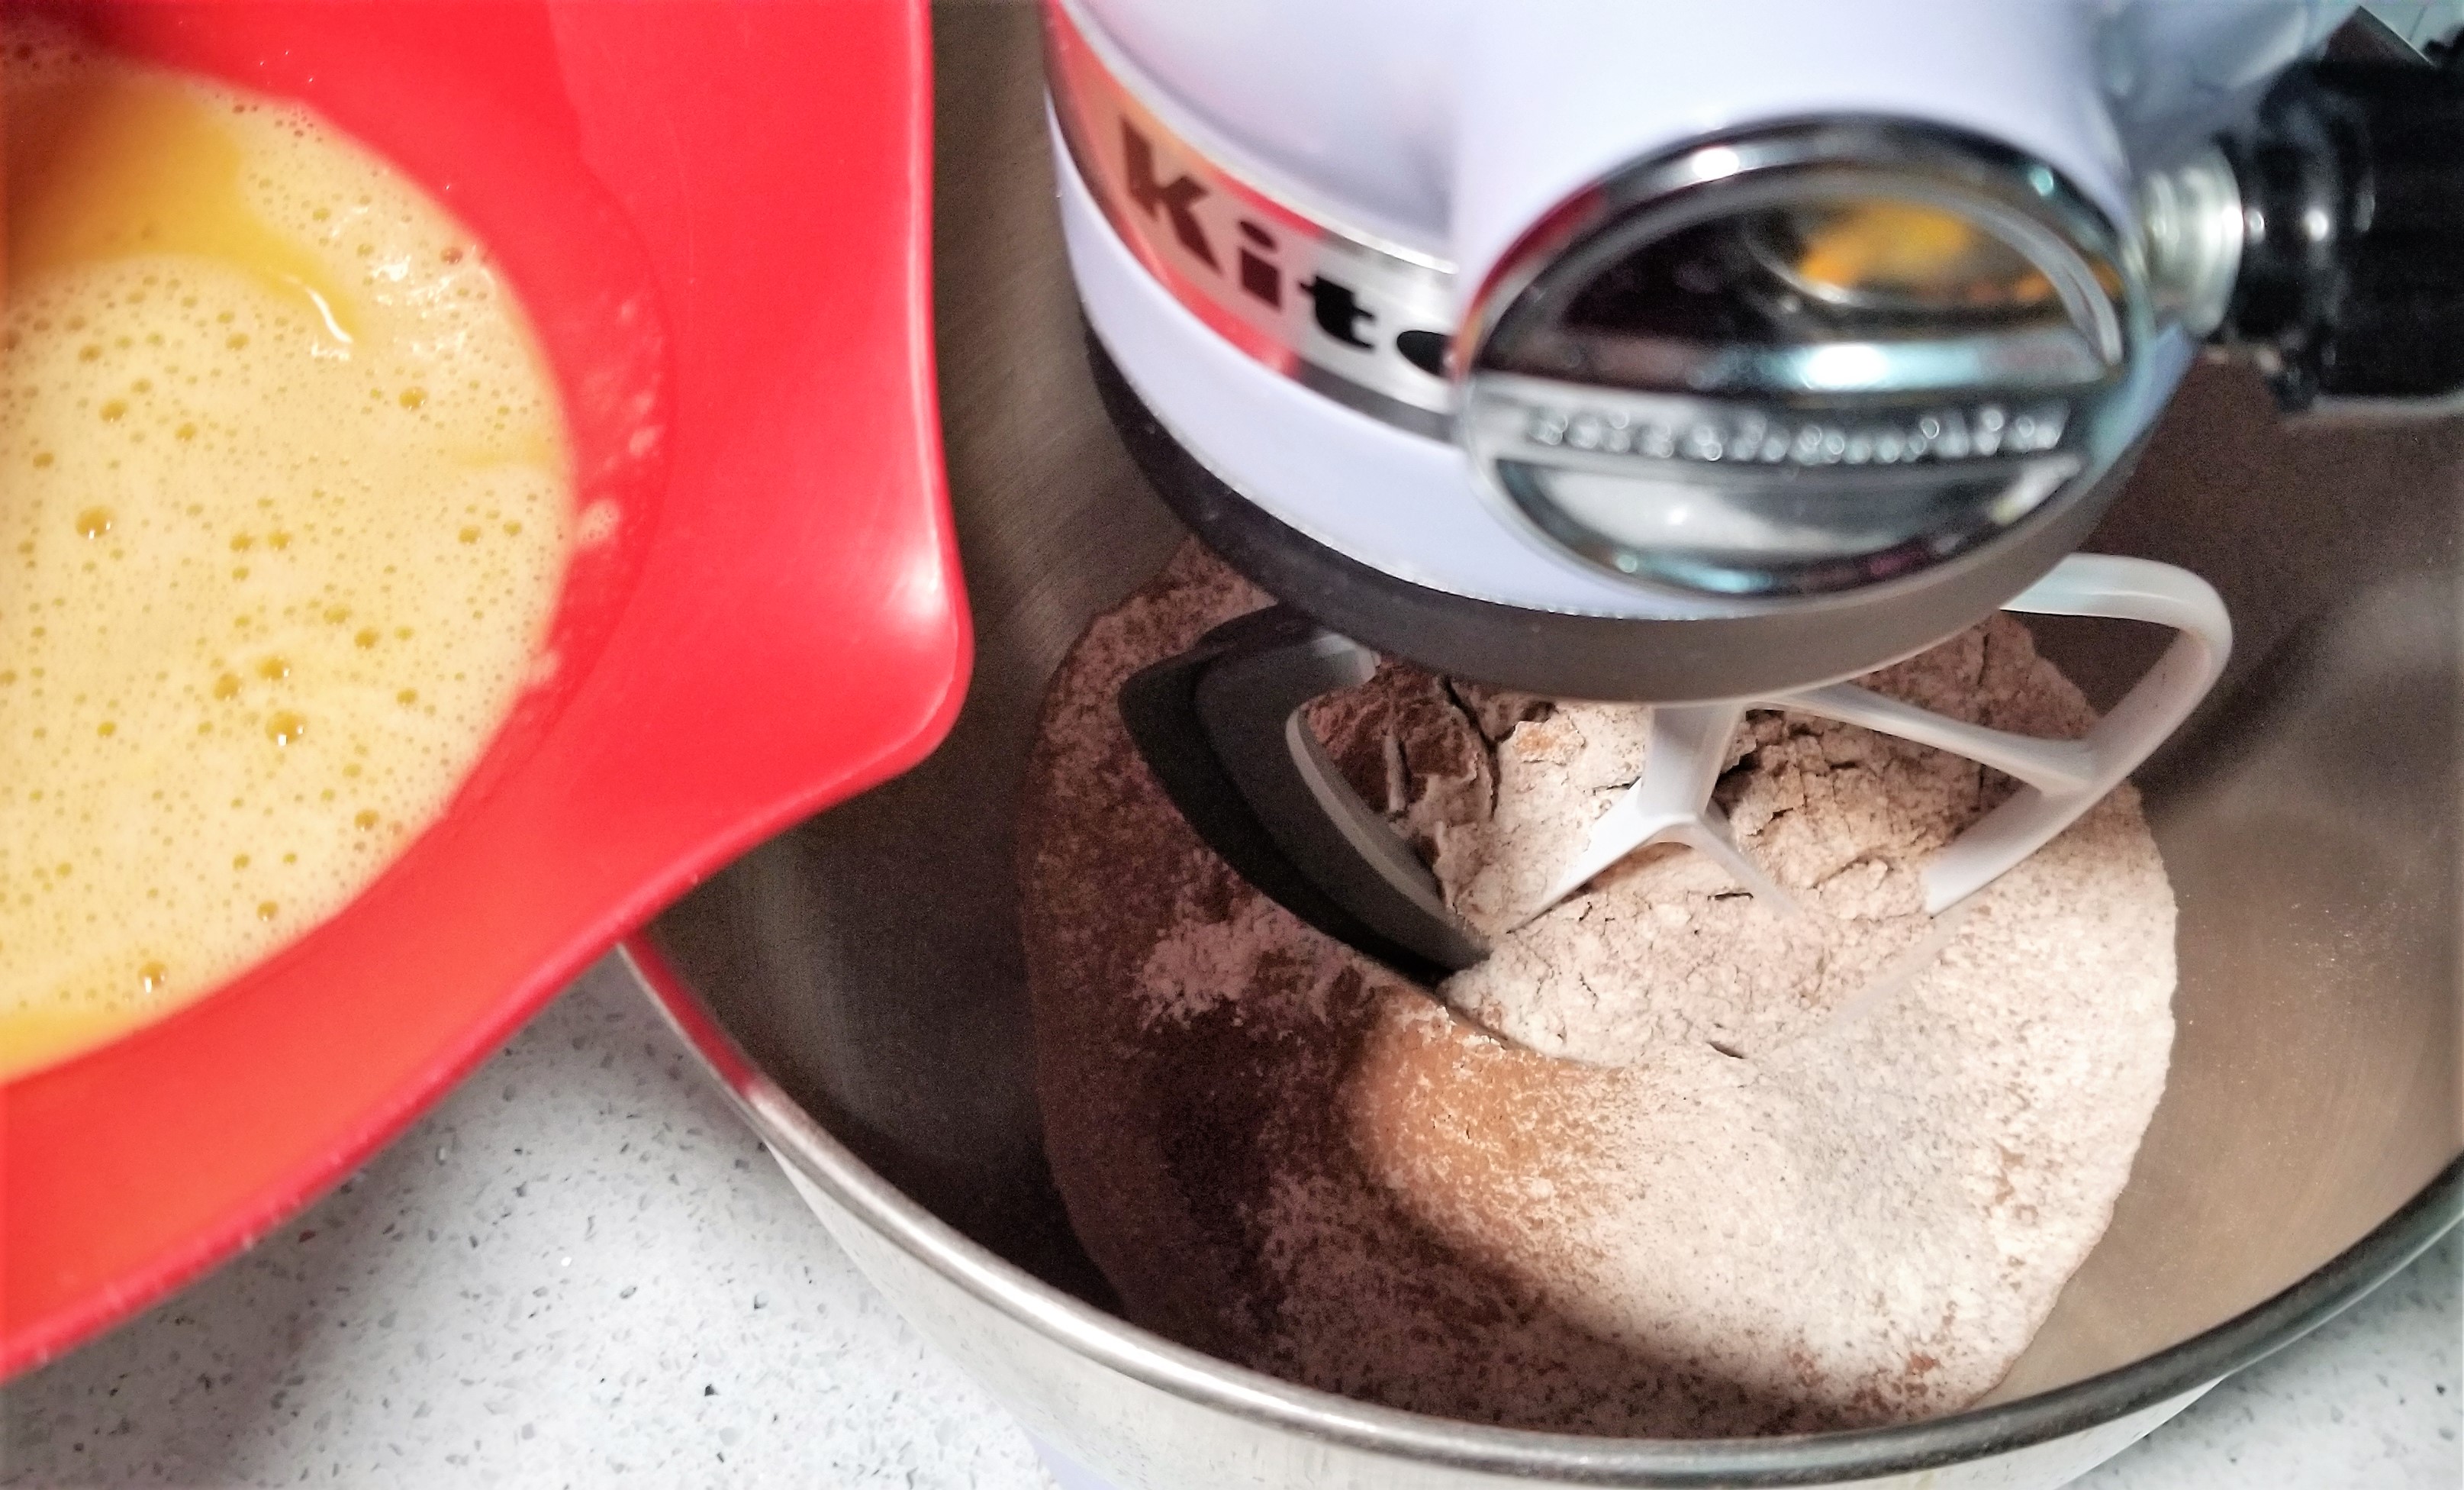
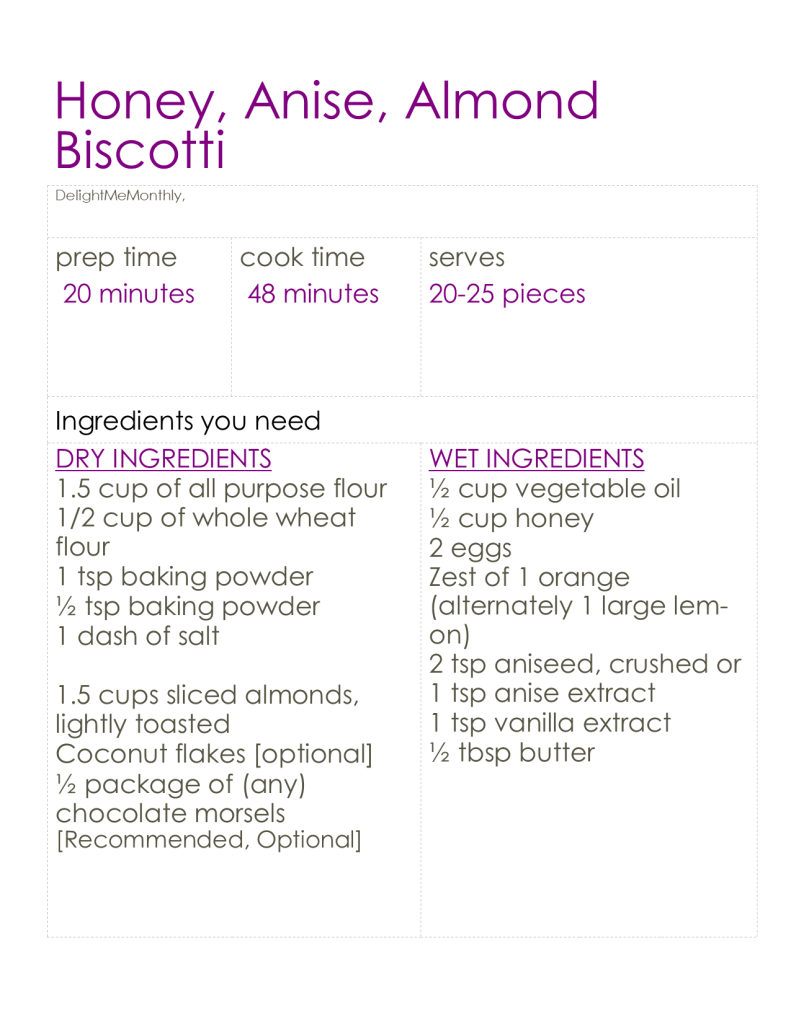
Biscotti has been on the To-Make list for months now. A colleague who has won every baking competition at work for the past 4 years said she has tried it a couple of times and failed miserable. I was prepared for this to end poorly. I checked out the Bon Appetit cookbook and found the traditional recipe for biscotti. Anise and Almond are the original biscotti flavors that really remind me of Italy.
As we are discussing in English, an Italian dish, we ought to cover the definition of biscotti. Break up Bis indicating “twice” and Cotti meaning “cooked” and you already know a lot about this recipe. Biscotti get their crunch from being baked twice, or three times if you over analyze the recipe. We will be baking the biscotti two times to make it nice and crunchy. If you are not familiar with this cookie-cracker like treat offers a soft crunch and a mild unsweetened flavor. It is unique and considered neither a cookie or a cracker, but is its own thing – bicotti.
For this recipe I did trade the anise for anise extract, because I had the extract already. When you do this you do need to reduce the amount as extracts are more potent.
Thankfully for me, making biscotti is a cinch! I did not have any trouble with this recipe. If you have trouble see below for some ideas. I am not crazy about this flavor but went on to make two other flavors in the exact same manner, ignoring the original instructions, and they worked even better. Stay tuned for Dark Chocolate Almond and Almond Pumpkin Spice!
Once baked
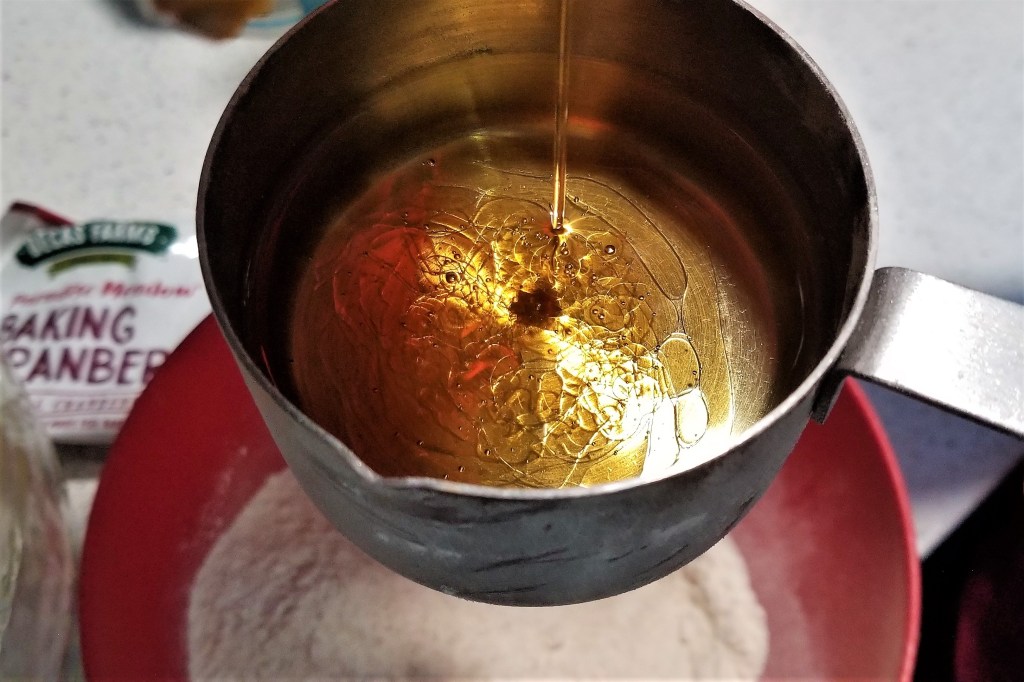
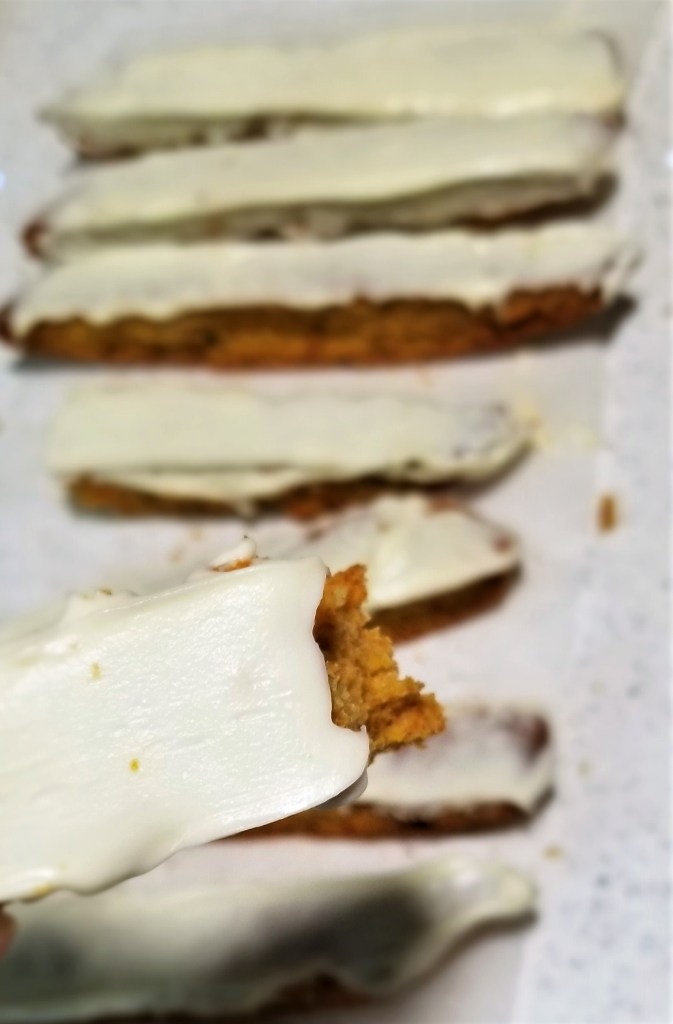
Take-Home Tips: The dough can be made ahead one day before and kept in the fridge. Try adding coconut flakes to the toasted almonds if you want a hint of coconut. When adding both honey and oil, measure the oil then add the honey to the same measuring cup so it comes out more easily. You should not need to scrape it out this way. If you wait until the loaves are cooled after the first bake they will be too hard to cut. When cutting the loaves, drag the blade across the crust until you break the top layer, then press the knife down to the surface rather than sliding the knife all the way through. This will reduce cracks and breakage. If your loaf is domed, be sure to break the whole surface before pressing down through the bread and almonds. This recipe pairs nicely with Warm Spiced Apple Cider as it will use your remaining orange that you zested for this recipe.
Scoring: 10 of 10! This is exactly what I wanted. The flavors blend well and the crunch is perfect. Better than store bought. The anise extract covered the kitchen at the start, but then the orange overpowered everything and the smell stayed strong. My husband immediately liked these better than the other biscotti I have made. Serve with cider, coffee, or wine.
Part of my baking and cooking journey began when I started trying various diets in college. Mostly I was on the Poor, Starving College Student diet. Occasionally, I did have some currency remaining in my bank account at the end of the month. More often than not, it was allocated towards food. At some point I decided, throughout my life I will make a point to try all the named diets (i.e. Gluten-free, Paleo, Keto, etc.). A friend challenged me to try not eating dairy for a week, and I quickly accepted and decided to see what the vegan diet is all about.
A week is not a very long time. I however am generally a very pro-carnivore person. In order to not set myself up for failure, I promised to dedicate 7 days to vegan eating, in case it was difficult and I caved longer than that.
In preparation, I researched meal ideas, wrote a list of ingredients, and made a meal plan for every meal of the week. Having family and colleagues who eat vegan, I knew some things to look out for. I decided honey (and fish, of course) were out of the running, I focused on protein rich foods, and I tried to keep healthier options in place of sugary ones. I purchased mostly fresh vegetables, trying to avoid frozen vegan meals, and made sure to prepare snacks so I would not have an excuse to cave. I did want to try and find a hummus that I like (spoiler alert, I still do not like it, sorry), and I wanted to try a meat substitute.
Lentil Vegetable Soup and Sweet-Sweet Potatoes and Carrots
Here is my week meal plan.
Breakfast:
+ Rolled Oats with ground flax, Silk protein almond & cashew milk, a banana, and a small amount of light brown sugar.
+ High protein slice of bread with almond butter and sliced banana on top
+ Bowl of fruit with a soy protein chocolate milk
This was plenty each morning and I was never hungry afterwards.
In medieval times, or even before refrigeration was common, almond milk was prepared and consumed as the main source of cream and milk. In the cities, cow’s milk could be a whole day’s drive away and was difficult to transport. I could spoil or spill in the journey. Additionally, merchants would often lie about the fat quantity; watering down the milk to sell more. Homemade almond milk was more readily made and integrated well in recipes.
Lunch:
+ Soup and Salad. For the salad, I made two kinds. [1] spinach spring mix, sliced strawberries, carrots, sweet corn, blueberries, raspberries, cantaloupe, and sliced apples. [2] spinach and hearts of romaine, cherry tomatoes, carrots, and celery. The plan was also to have chickpeas, but I chickened out after trying hummus again.
For the soup I also made two kinds. [1] Lentil French Onion: vegetable stock, leeks, celery, carrots, garlic, 3 onions, lentils, parsley, basil, and white bread. [2]: Lentil Vegetable Soup: cauliflower, broccoli, carrots, leek, garlic, tomatoes, peas, and corn. I also added the white bread to the vegetable soup. I would recommend toasting it first if you are going to store it in the container with the soup.
I planned a 6 or 8 oz container of soup with a side salad each day. I ended up being pretty full around lunch time and did not eat both every day.
Dinner:
+ Spaghetti squash with boca crumble: 1/4 spaghetti squash, oil, onion, celery, tomato sauce, garlic salt, oregano, and fresh basil. That was just as good as regular spaghetti, if not even a bit tastier. This made four hearty servings, could have been six.
+ Roasted potatoes and vegetables: baby red potatoes, rosemary, thyme, garlic, onion, oil. Boiled then pan fried to add the seasonings and onions. For the roasted veggies, I had a Birdseye steamfresh bag already in the freezer with Brussels spouts, carrots, and broccoli. You could roast the potatoes with the vegetables, but I wanted them separate.
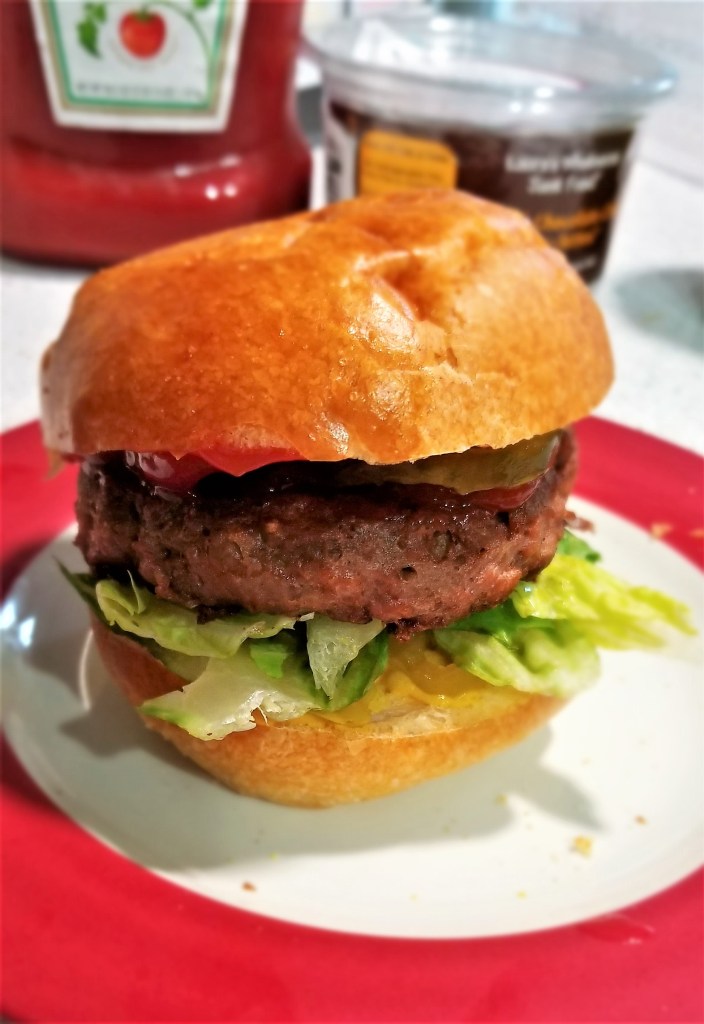
+Beyond Burger: pickles, ketchup, lettuce, tomato, on a bun. However you like your burger!
+Roasted Sweet Potato and Carrots: I do two versions of this, a sweet and a savory. For the sweet: sweet potatoes, carrots, green apple with cinnamon and nutmeg. For the savory: sweet potatoes, carrots, celery with rosemary, thyme, and oregano.
+Zucchini with Beyond Burger: sliced zucchini (or spiraled) with seasoning, and a burger patty in a leaf lettuce wrap. I covered both in garlic salt and marinara.
I planned left overs for the rest of the week and still have some spaghetti squash to eat.
Snacks:
+ toast and almond butter (or peanut butter if you can) with either jam, banana, or apple slices on top.
+ Fuji or honey crisp apple
+ nuts, dried fruit
+ celery or carrots in hummus – if you are a normal person who likes this stuff.
Turns out it is possible to survive without meat or cheese for a week. It wasn’t that hard but habit made it irritating at times. My take-away would be planning a day each week at least without meat. I will definitely think twice before adding cheese to everything I eat. But I don’t feel the need to be vegan all the time, maybe some day, but not today. I definitely encourage anyone who is dedicated to this diet and lifestyle, keep going strong. If you have not tried it, it might not be as bad as you think. Keep an open mind and do what is best for your body.
All the sane people living on this planet can agree that the best time of year is Fall or Autumn. It even has two names that we use interchangeably in America. In Summer, especially in the South, temperatures rise to unbearable levels and people can perish. It is a struggle and arguably not worth the few nice days at the beach. Winter fairs a similar story for our friends in the far north. There are magical days, but there are also those full of struggle, misery, and numb feet. Spring is full of the devious yellow pollen that covers our cars, clogs our nose, and irritates us all. Yes it is beautiful with the new year’s flowers, and the warmer days, but it can also have very hot days that remind us Summer is rearing its ugly head.
Then there is the most perfect season of them all. The leaves remind us they know more than just green before they release themselves to join us on the ground. Even as adults we enjoy crunching them as we walk. The traditional foods and drinks draw us closer together. The cooler weather brings hope, joy, and our favorite sweaters out of the attic. Yes, I cannot argue any faults with my favorite season of the year. I am in love, have always looked forward to this time of year, and cannot wait to eat all of my favorite fall foods.
I am shying away from too many pumpkin infused desserts in order to offer a wider variety. For those of you who want to try something healthier, lighter, or different from the monotonous pumpkin spice filling the air, this might be the ticket. Considering the significance of the pumpkin, I cannot leave it out entirely, but there are sever other squash cousins, breads, and drinks we do not want to leave out.
Okay, I cannot wait any longer. Madame Autumn, here we come!
September was a challenging month for baking. Between traveling for work and my birthday, I was not at home very often. I did however try to make petit fours this month. The success was limited.
Petit fours (acceptably pronounced in either proper French, or the Americanized ‘Pet-eh For’) can refer to numerous small, French treats popular in the 19th century. Taken literally, Petit Fours refer to the “small oven” in French villages. This is in contrast to the “large oven”, or Grand Fours. Contrary to your initial thoughts, this does not refer to the size of the oven. Instead, large and small here describe the amount of heat in the oven. Without electricity and other modern conveniences, it was difficult and expensive to heat an oven up, maintain that temperature, and successfully bake temperate treats or breads inside. Therefore, when the oven was cooling down, a slower process, the heat it held would still be utilized for a group of 35-40mm sized cakes. These range from Madeleines and iced cakes, to savory Salé canapés and on to other European cakes.
Preparing the cake, glaze and white chocolate ganache
I really marvel how high the standards were held even in the 1800’s for a baker (un boulanger) when the conditions were challenging. Next time your cake falls to crumbs, in your modern kitchen with all the tools you purchased (rather than having your spouse or neighbor hand make them), be grateful you did not spend hours preparing the oven and months growing the ingredients.
The store bought is much thinner, lighter, and harder to spread. Use an offset spatula!
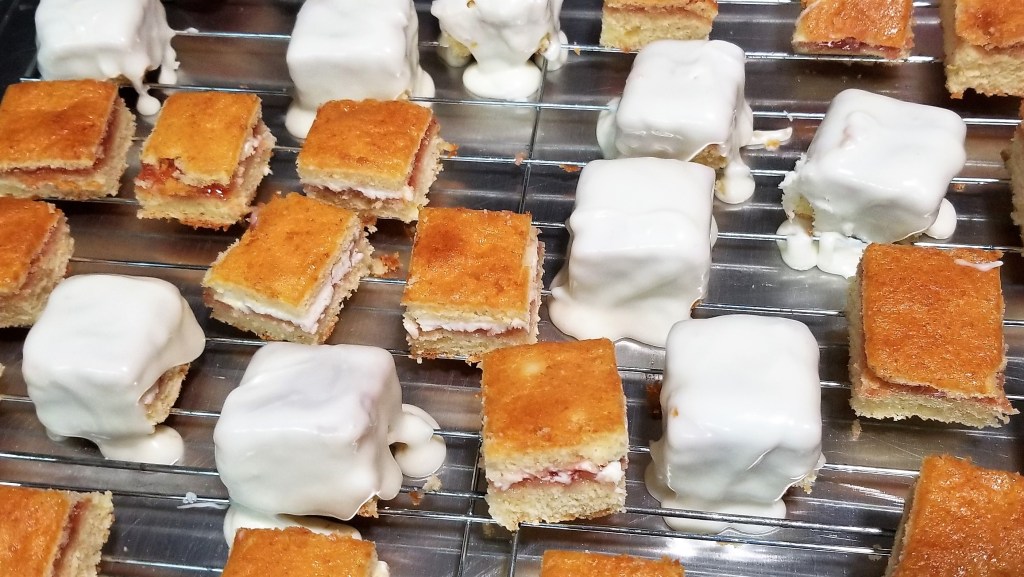
There is a grocery chain called Publix, headquartered in Florida with stores throughout the southeast US, which is locally renown for their bakery. They have these perfect layered cakes about 1-inch square cubed, covered and decorated. I purchased 40+ for my wedding shower years ago, and find them to the ideal size and quantity of sugar. They are great for parties because there is no need to cut the cake or to have plates or utensils, most people do not want a whole piece of cake, and there are fewer crumbs and left overs this way.
At first, it did not appear to be especially challenging. I had a general idea that in order to make these tiny cubed cakes, I would simply make a large cake and cut it up. I did assume the hardest challenge would lie in baking such thin, even, and consistent layers. Then I asked myself, and sequentially Google, what is the coating that covers them? The coating could be a thin glaze that is mostly transparent, or a thick fondant, or even chocolate ganache. The glaze sounded the easiest, so I went with that route.
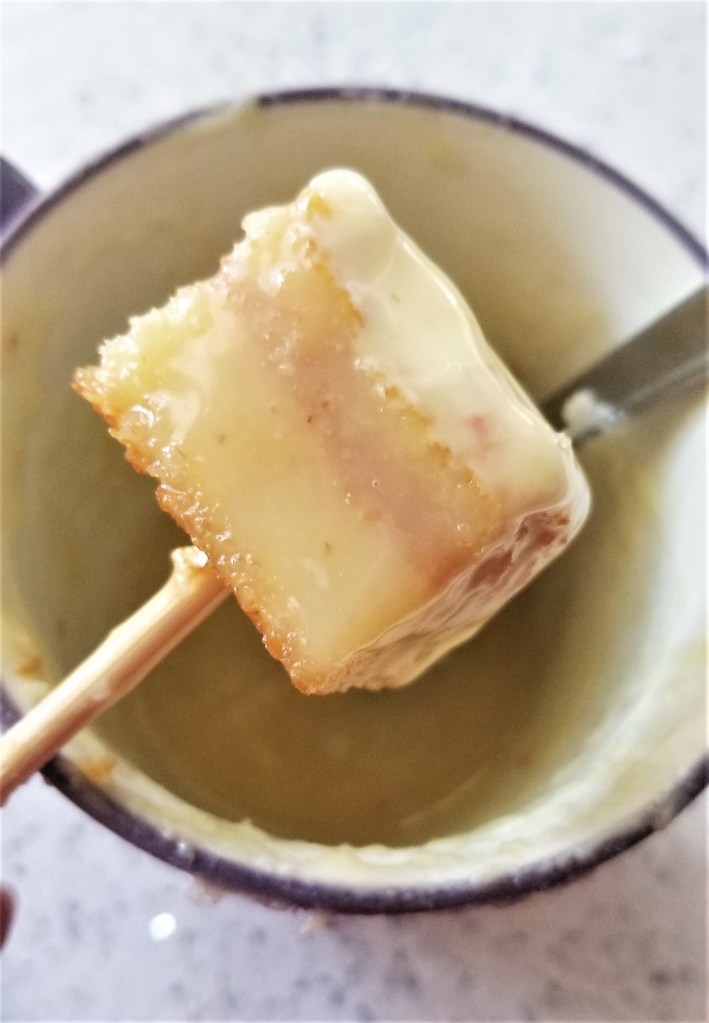
Let me spoil the ending by explaining the complications along the way. I tried to make perfectly cubed petit fours at least four full times. I tried partial steps along the way to perfect those aspects. These are not easy to make. I would in the end recommend buying them. After inquiring of the Publix bakery, it turns out only some of the bakeries make the petit fours in house while the others are sent the covered, frozen squares to decorate with little flowers. After dissecting them I decided they are covered in white chocolate, which I would recommend as the best way to prepare them yourself.
The general steps I took:
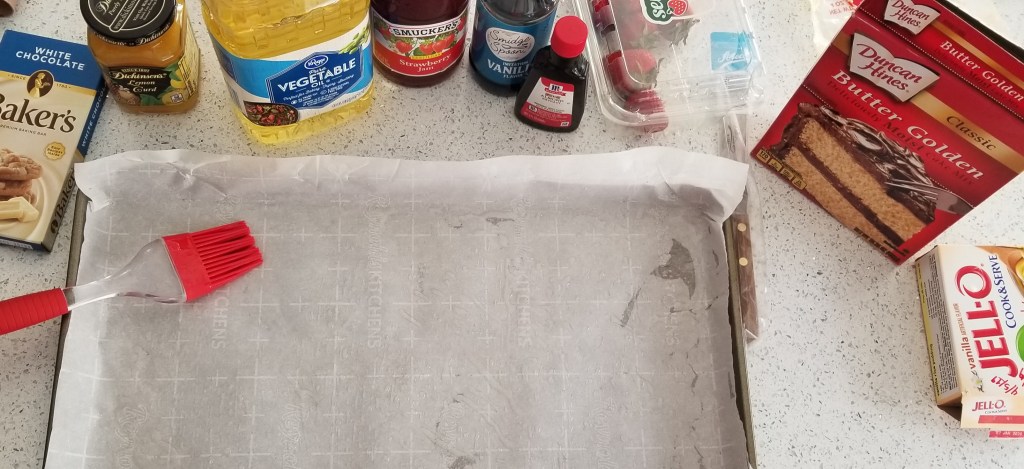
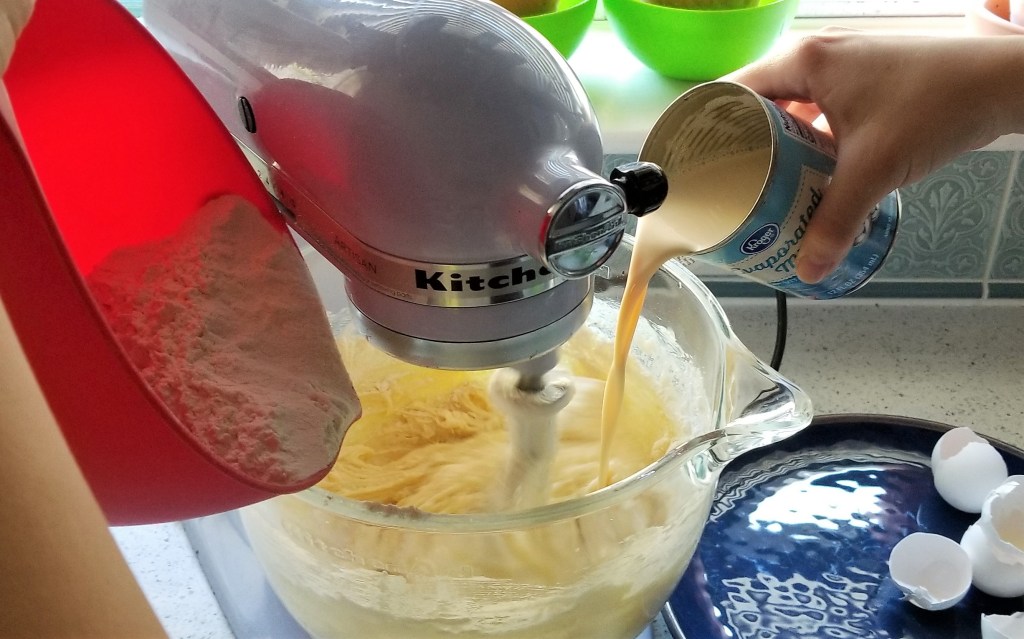
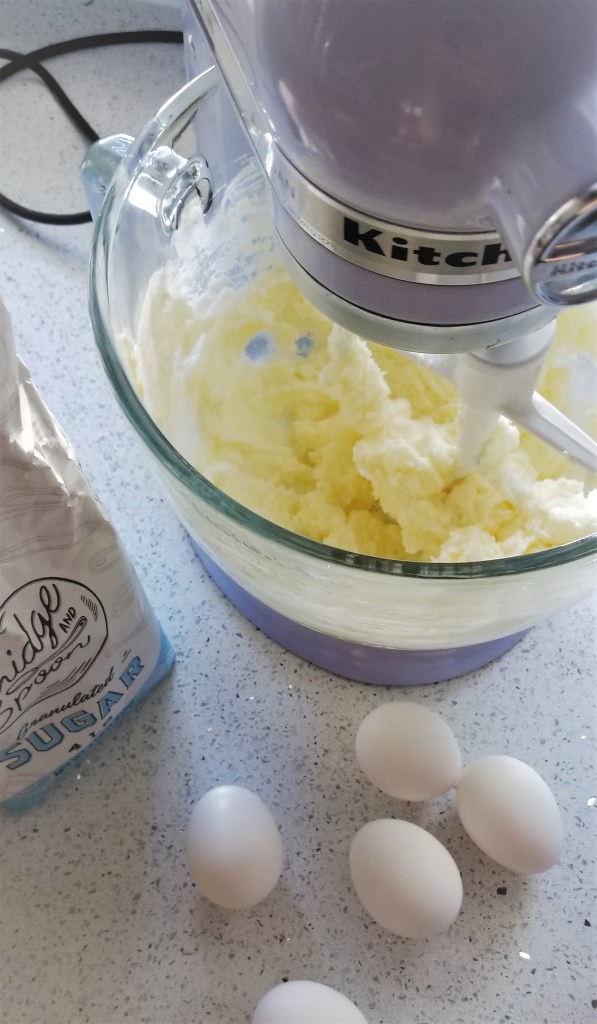
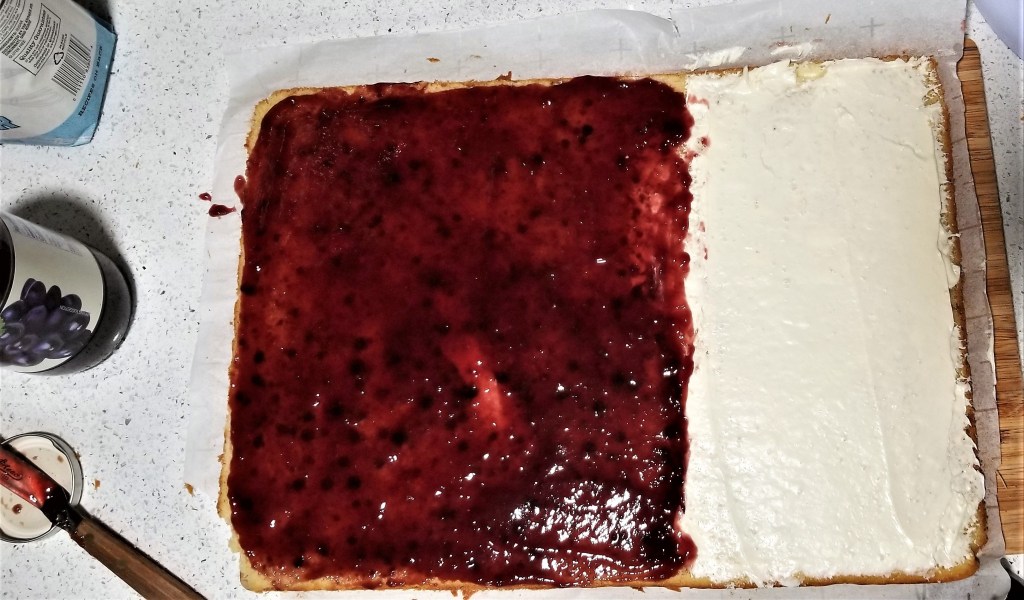
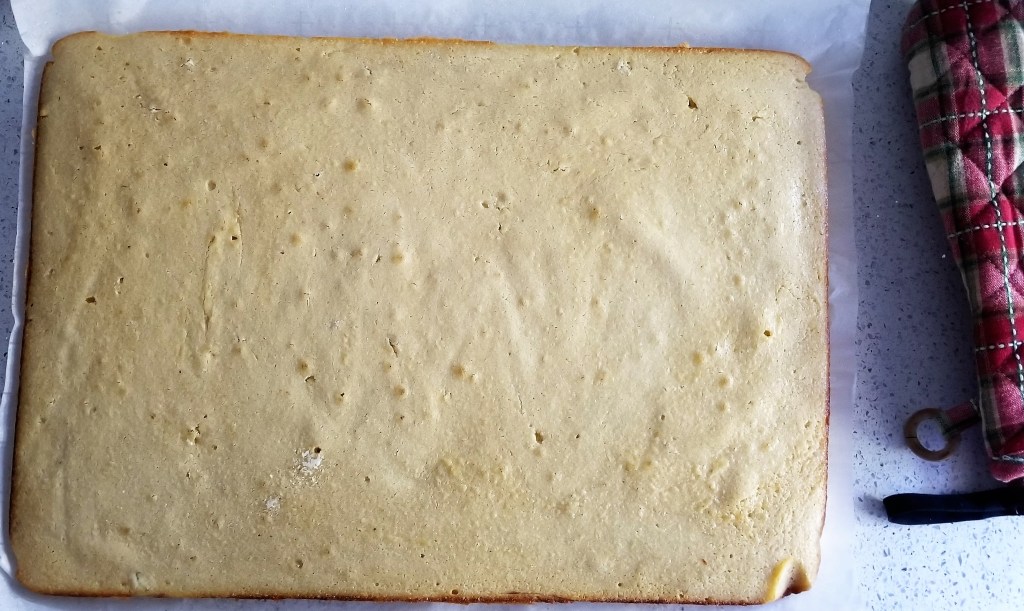
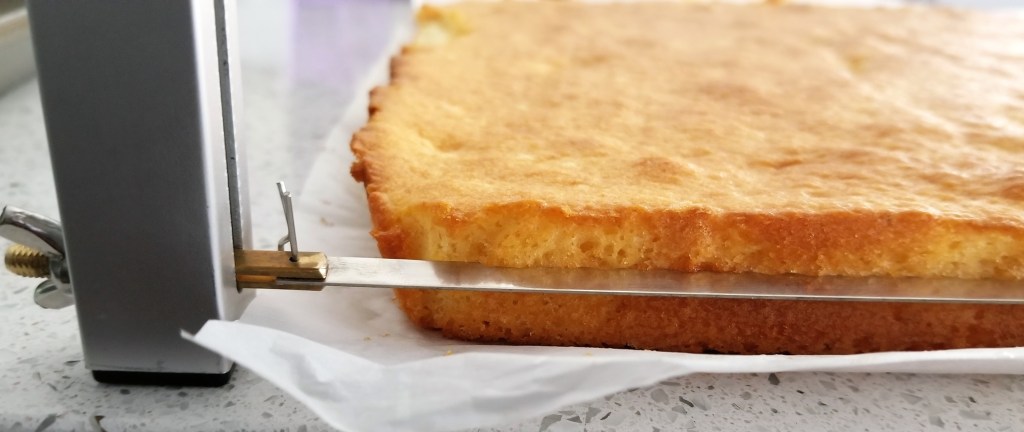
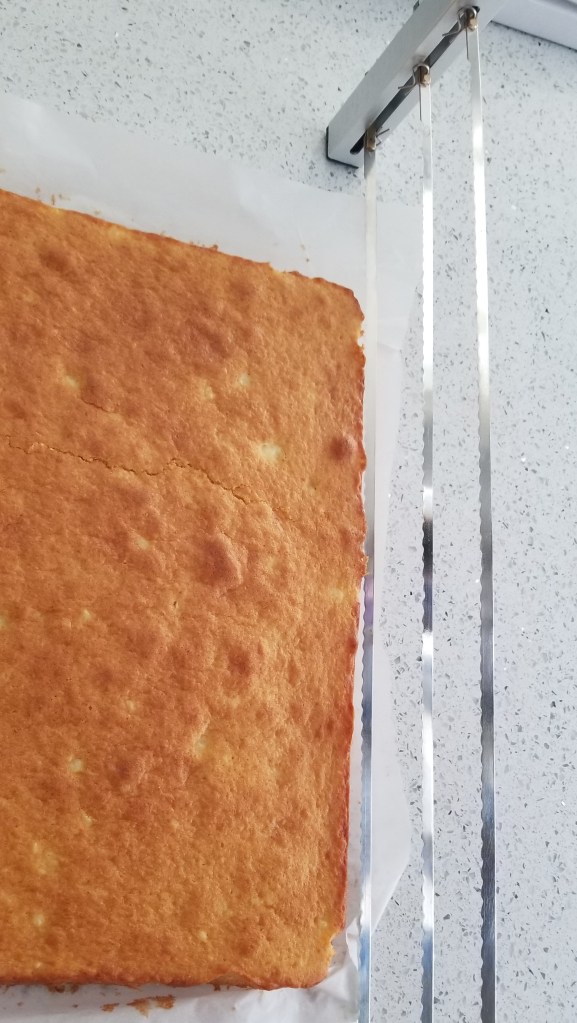
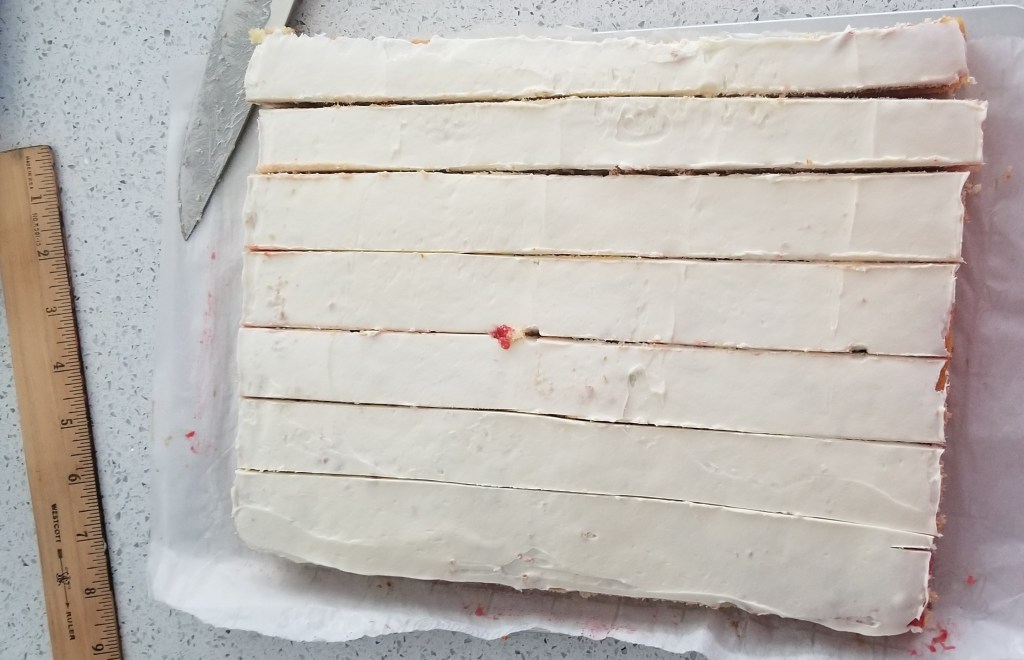
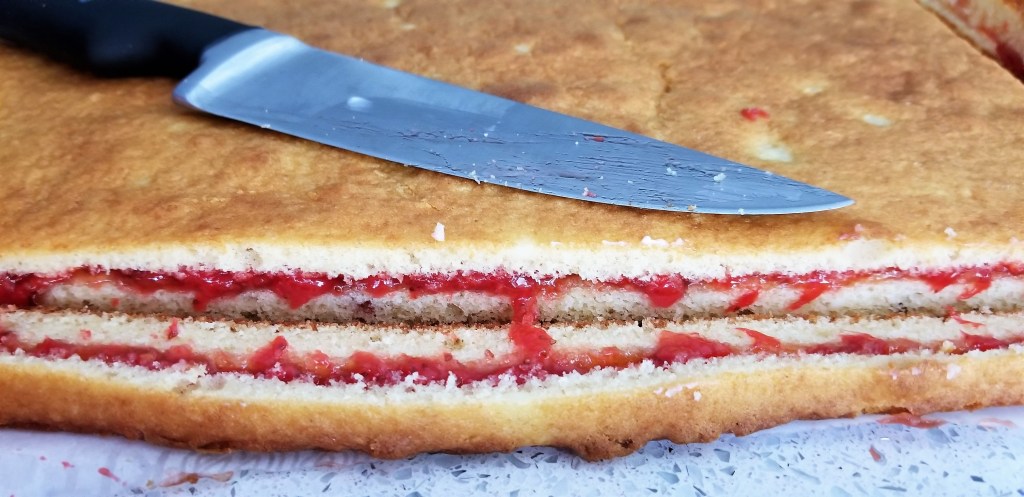
Prepared a large sheet cake (9×13 or 13×17), cooked and cooled it, then used a cake cutter to cut 1 layer horizontally through the cake. In the end this made about 1 inch tall cakes when they were covered and about 3/4 inch uncovered.
Made the coating in two ways, my trials were [A] a glaze and [B] white chocolate:
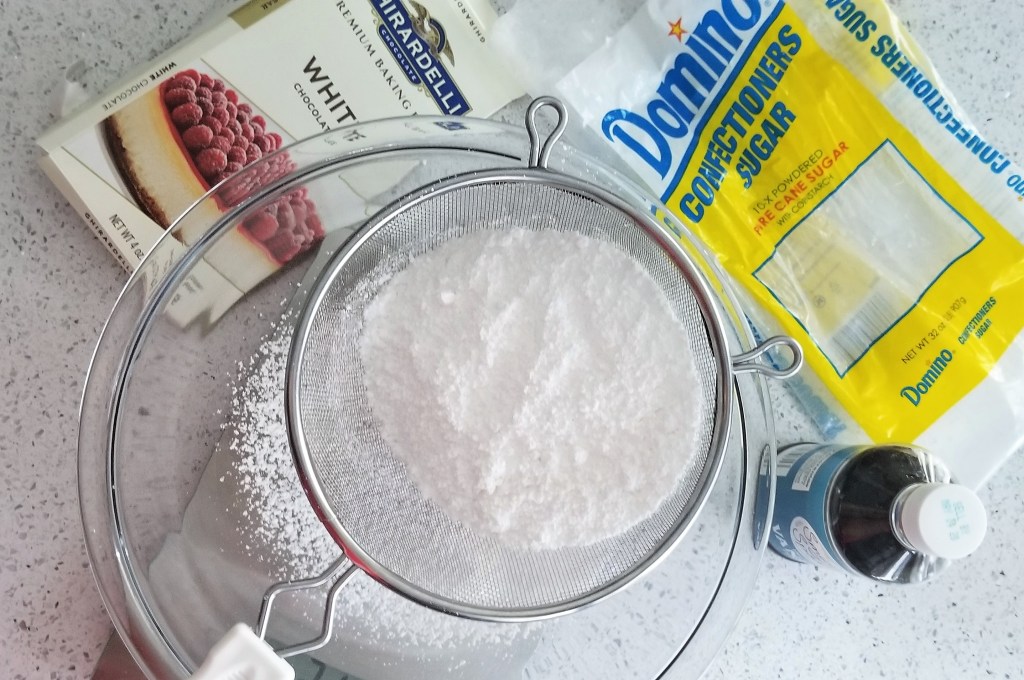
[A] Melted icing/powdered sugar, water, vanilla, and the tiniest amount of white chocolate to make a glaze. It was recommended to use light corn syrup, but I didn’t have any at the time.
[B] After finding the nice white chocolate to cool too quickly, I purchased four trays of packaged candy coating that just needs heating in the microwave and found this to work the best.
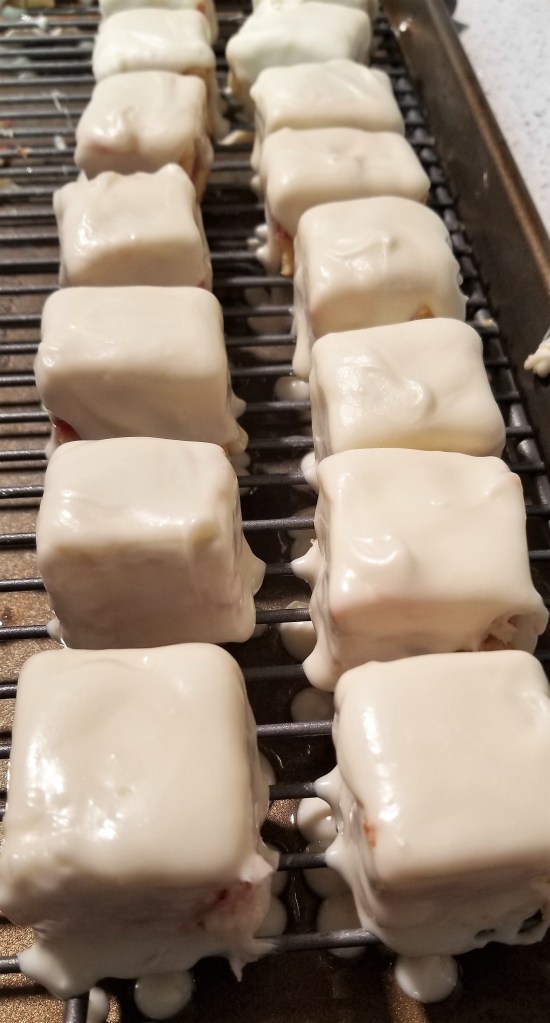
I froze the cake, cut it into 1.5 inch squares, then stuck them part way on a skewer. I dipped each into the [A] glaze, let it drip off, then quickly dropped the skewer through a raised wire rack and pulled out the skewer. The cakes then dripped and cooled. For the [B] white chocolate I used a chocolate dropper funnel to pour the chocolate over each cake. When the extra chocolate dripped off, I scraped it up and remelted it.
They then cooled and you could decorate them with frosting flowers or chocolate designs.
Areas where I ran into trouble:
Surprisingly no trouble cutting, separating, or layering the cake. I did have a cake saw which really helped, but a knife works as well. I used a thin, slippery (or oiled) cutting board to transfer the top layer while I added the filling. I had help the first time, but it was so easy to transfer that I was able to do it myself the second time. The cake didn’t crumble or crack!
The [A] glaze was too thin and did not make an opaque cover like I wanted. It was very sweet. If you use the glaze you won’t need more than a 1/4 cup of sugar in your cake. This method only works if you cakes are very frozen (freeze them before and after cutting them), the glaze needs to be under 90F, and the glaze needs to be in a deep, preferably narrow, bowl. Spooning the glaze or ganache on the cakes would be easier, however it does not coat the bottom of the cakes.
The [B] candy coating/white chocolate method was what I really wanted. It qualified as opaque, perfect amount of sweet, gave more structure and sturdiness, as well as covering up some errors and helping with uniformity. It does harden very quickly! This became a problem when the chocolate dripped around the wire rack. The cakes were then stuck to the rack (face-palm). When I tried the white chocolate the second time, I would coat four of the cakes at a time, cut around each with a knife, then continue on. It did not matter that I did not cut well or removed all the chocolate before allowing it to harden. Simply doing that much helped when breaking off the chocolate all the way later. It worked surprisingly well.
You will go through a lot of candy coating very quickly. It has to be reheated frequently, be sure not to use any metal tools.
Cooling to the wire rack
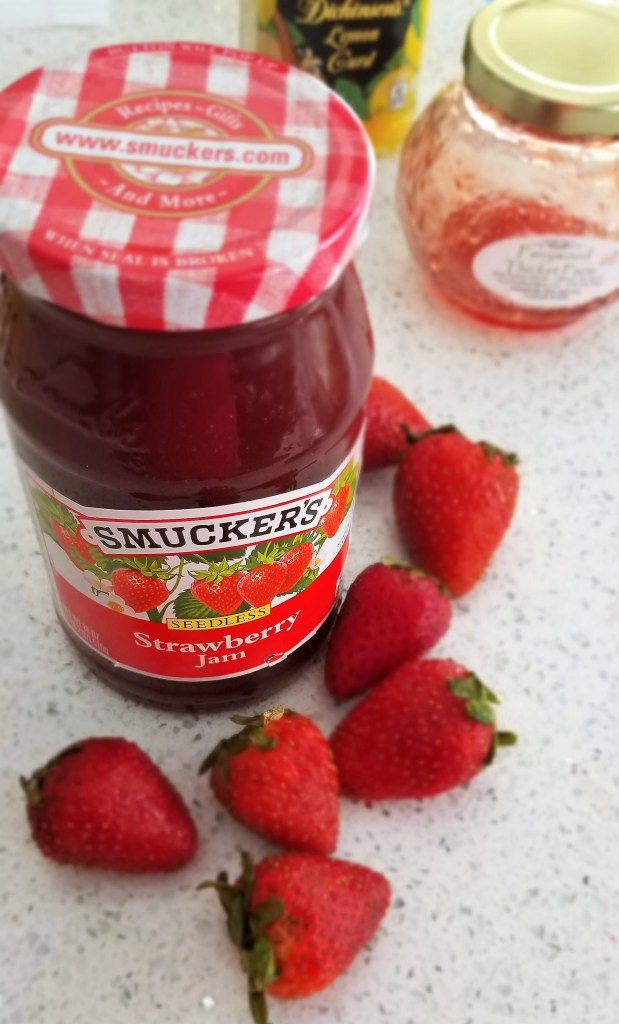
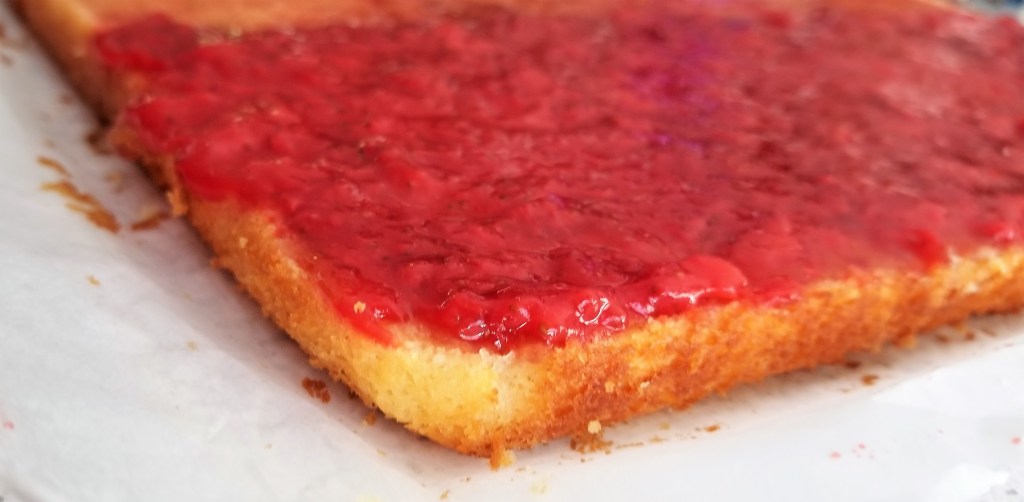
Take-Home Tips: Over all I do not recommend making these at home. They are cheap to buy. If you do want the challenge though: Make a pound cake-like sponge, dense without many holes and consider adjusting your recipe for the size pan you use. Line the baking sheet with parchment paper! it helps so much throughout the process. Keep the cake on the paper as long as possible. I even put it in the freezer on the same paper. Use homemade jam or jelly (any flavor) rather than store bought for the filling, it really makes a difference in thickness and color. You can also use cream cheese frosting on top of the jam. A cake saw/cutter is highly recommended, if not required for such a thin cake, but you need one that can adjust on either end in the case of not level thicknesses. Freeze your cakes before and after cutting them, and cut them slowly so they are relatively even. If you glaze, allow it time to cool and do not try to dip them too early, you can always heat it up if the first one is too heavy as it comes out. Prop your rack on cans or jars so you can pull your skewer through the bottom and leave the cake to drip. Your hand may get sugar coated in the process. Use food coloring to help make the icing more opaque. You can always decorate the outsides once they have refrozen. No need to thaw either, serve straight from frozen for the best structure. Keeps in freezer for weeks with little change in the flavor or staleness.
Don’t forget to trim the edges first
Scoring: 7 of 10. They were delicious. They were not worth making. They were frustrating and imperfect. You cannot really tell the difference in the different flavors and for the most part they task like whatever you coat them in. To do multiple layers, you would need precision with your blade and a very even cake. I only believe I would be able to do one cut with my saw and did not try to do 2. You could make them slightly taller, do 2 batches of the cake and simply add another layer of jam to get to 4 layers.